In 2 separate occasions today, I've come across the following error:
The application-specific permission settings do not grant Local Activation permission for the COM Server application with CLSID {6B3B8D23-FA8D-40B9-8DBD-B950333E2C52} and APPID {4839DDB7-58C2-48F5-8283-E1D1807D0D7D}
Also in both cases, the system was a Dell All In One. One was an Dell Inspirion 24" and one was a Dell Optiplex 7440. Both had Intel HD Graphics 530 and both needed the Intel RST updated.
Once again, I urge everyone to purchase Dell business class computers. I've been saying this for 20 years now and it is still the same issue. The business class systems are supported better. It isn't worth saving the money just to have you paying me to fix it for you. There is no savings.
This time around, printing to a Konica BizHub would automatically delete the print job with the status "Error Deletion" and the details, "Login Error."
But yet, others could print without hassle. What gives?
Konica BizHub printer options are awesome. There are so many settings it is mind blowing. One of these settings is User-Authentication or User-Auth.
If User-Auth is set to ON (on the physical printer\web settings) and the printer is installed, the driver is set to automatically pickup the settings of the physical-printer. Since the setting is User-Auth = ON (on the physical printer\web settings), the driver picks up that setting and tries to send a username & password. Since there are no usernames & passwords setup, the print job fails due to a login error.
How do you get around this?
So to print, you can manually set the settings on the print driver (rather than automatic). This allow you to set printer to User-Auth = OFF (on the driver).
Hyper-V VHDX disks can be created from a physical computer with Disk2VHD. You will end up with a VHDX disk. If you run into a problem where you cannot run Hyper-V, VirtualBox is a good alternative. The roadblock you might run into is that VirtualBox cannot run VHDX files. To convert to VirtualBox VDI Disk (VirtualBox native format):
-click START > RUN
-type: cmd
-inside the command window, type: cd c:\program files\oracle\VirtualBox\
-hit enter
-type: VBoxManage clonemedium disk c:\path-to-vhdx\DESKTOP.VHDX c:\path-to-vdi\DESKTOP.VDI --format VDI
Now simply create a VM and use/attach the VDI disk. (In the settins, I had to checkmark "Enable I/O APIC")
Bonus
Let's say you want to start the VM without a GUI. This is "headless". If you want the VM to start when the host starts:
-click START > RUN
-type: cmd
-inside the command window, type: cd c:\program files\oracle\VirtualBox\
-hit enter
-type: VBoxManage list vms (this will show a list of VM's)
Let's add the VM to start automatically on a Windows host:
1-First create a folder in your Outlook called: SearchAndDeleteLog (As a root folder. Not an INBOX subfolder)
2-Now in Exchange-Mangement-Shell EMS) search for the messages with the SENDER, DATE and SUBJECT and put the results in your own mailbox:
Get-Mailbox -ResultSize unlimited | Search-Mailbox -SearchQuery {from:
This e-mail address is being protected from spambots. You need JavaScript enabled to view it
AND Received:"03/17/2018" AND Subject:"Your bank statement"} -TargetMailbox "my.account" -TargetFolder "SearchAndDeleteLog" -LogOnly -LogLevel Full
Or for a date-range:
Get-Mailbox -ResultSize unlimited | Search-Mailbox -SearchQuery {from:
This e-mail address is being protected from spambots. You need JavaScript enabled to view it
AND Received:"03/16/2018 10:00..03/17/2018 13:00" AND Subject:"Your bank statement"} -TargetMailbox "my.account" -TargetFolder "SearchAndDeleteLog" -LogOnly -LogLevel Full
4-After you are sure of the results, run the command to delete:
Get-Mailbox -ResultSize unlimited | Search-Mailbox -SearchQuery {from:
This e-mail address is being protected from spambots. You need JavaScript enabled to view it
AND Received:"03/17/2018"} -DeleteContent
If you need to copy the messages from a specific mailbox:
Get-Mailbox foo.user | Search-Mailbox -SearchQuery {from:
This e-mail address is being protected from spambots. You need JavaScript enabled to view it
AND Received:"03/01/2018"} -TargetMailbox "my.account" -TargetFolder "SearchAndDeleteLog"
-click RESOURCES (at bottom-left, to add the room to the RESOUCE area).
-click the date and time you need.
-click SEND
This will schedule the room for you, put the event on your personal calendar, put the event on the room calendar for everyone to see and manage if it is in use or not.
Everyone In Office To Add Events To A Shared Calendar
If everyone in the office is "playing nice" and if you just want the calendar to show, have people double-click on the calendar day to start an event and schedule a time, then set the calendar permissions to AUTHOR:
Your scanning used to work from the Ricoh/Savin. It used to go right into a folder you had setup.
Then the computer updated itself in the Fall/Winter of 2018 or early 2018.
Now when you try to scan, it doesn't work.
This is because the computer updated to Windows 10 v1709 (aka Fall Creators Update). In this update, a change was made so that your computer can no longer talk to the Ricoh/Savin scanner. The update took away a communication protocol called SMBv1.
The correct fix is to change the way the scanner talks to the computer and use a newer communication protocol.
In lieu of making those changes, you can re-enable SMBv1:
First step is diagnostics; find out how hot it is running. There is a package called lm_sensors.
Installation
lm_sensors is installed by default in Centos. If not, you can install: yum install lm_sensors
Detect The Sensors
lm_sensors needs to know what sensors are available. To do this: sensors-detect answer YES to all the questions / accept all the defaults
Show the Temp
lm_sensors will show the temperature in C by: sensors
Or will show the temperature in F by: sensors -f
Or to see a continuous monitor of temp by: watch -n 2 sensors watch -n 2 sensors -f watch -d sensors
How Hot?
A normal temperature is 45C/100F.
A high temperature is 87C/189F.
A critical temperature is 105C/225F.
Fans should kick in around 60C/140F.
Why Hot? CPU
The burning question (ba-dom-tiss), why is it hot.
One reason could be the CPU. The CPU will have different speeds that it can run. So a 2700 CPU may only be running at 1200. This is called "governors".
To see your max speed and current running speed: grep -E '^model name|^cpu MHz' /proc/cpuinfo
Not all cpus will have the same options. To see your available governors: cat /sys/devices/system/cpu/cpu*/cpufreq/scaling_available_governors
To see your set governor: cat /sys/devices/system/cpu/cpu*/cpufreq/scaling_governor
Or: service cpuspeed status
And if that doesn't work, try: /etc/init.d/cpuspeed status
To set your governor: echo ondemand > /sys/devices/system/cpu/cpu*/cpufreq/scaling_governor
Why Hot? Graphics Chip
A second reason is the graphic chip or graphic drivers. In laptops, secondary graphics cards can be installed along with the built-in graphics card. The idea is that the secondary card takes over when the built-in card needs it. This is called discrete graphics card or Nvidia’s Optimus graphics-switching technology. The idea is to save power and to make the battery last longer. There are all sorts of problems this happening in real life.
To see if the discrete graphics card is on: grep -i switcheroo /boot/config-*
To change, edit the file manually and change "CONFIG_VGA_SWITCHEROO=n" to "CONFIG_VGA_SWITCHEROO=y": vi /boot/config-2.6.32-696.20.1.el6.x86_64 (of course, change the config number file that you select when you boot the laptop)
Then reboot: signal-event reboot
Why Hot? Fans
For me, the laptop isn't hot. It is just that the fan are running at full speed all the time.
Typically, fan control is done through a service called: acpid (this is the same service that provides shutdown control when you press a power button). But, in some cases, Dell laptops lacks ACPI fan control capability. Also, Dell laptops lack pwm-capable sensor for the fans/pwm controllable fans. So lm_sensors from above will not find a sensor for the fans. Consequently, the following typical solutions will not work:
trying with ACPI boot parameters. fancontrol/pwmconfig program.
/************************************** SIDEBAR
Some have had luck editing the /etc/grub.conf file and editing ACPI boot parameters by either reporting to the BIOS as Linux or reporting as not Windows 2012. When Linux boots, it reports to the BIOS as Windows. Reporting as Linux may allow it more control.
In the same fashion, reporting as Linux doesn't work but reporting as not Windows 2012 does work.
vi /etc/grub.conf you will see a list of kernels with numbers. Ususally the highest number is the newest release and the one being used. find the line that starts with: kernel at the end, simply add: acpi_osi=Linux or at the end, simply add: acpi_osi='!Windows 2012'
You can also test this before making the changes permanent:
reboot wait till the list of kernels show use the up/down arrow keys to move the highlighted kernel select the kernel (again, usually the highest number). press 'e' (for edit) selec the line that starts with 'kernel' press 'e' again (for edit) go all the way to the right (it usually puts you at the end of the line) at the end, simply add: acpi_osi=Linux at the end, simply add: acpi_osi='!Windows 2012' at the end, simply add: acpi_enforce_resources=lax press enter (to accept the edit) press 'b' to boot
The firmware of the base can be updated via the web.
The firmware of the handset can be updated via the web (if the base firmware is new enough). Or the firmware of the handset can updated via usb. This requires the usb tool here: Upgrading W52x Handset Firmware.zip
UPGRADE YEALINK W52P BRICKED / NOT RESPONDING
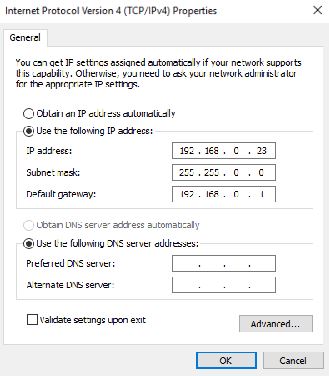
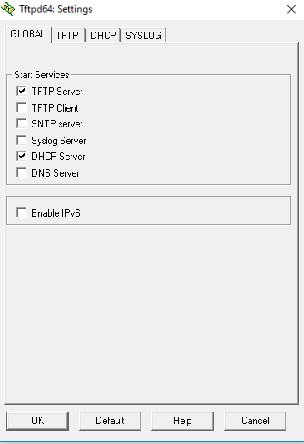
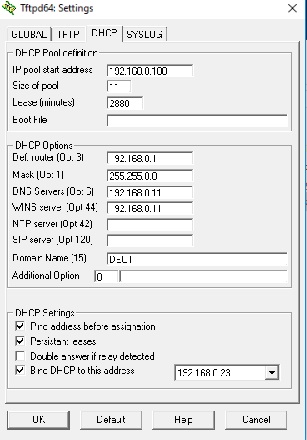
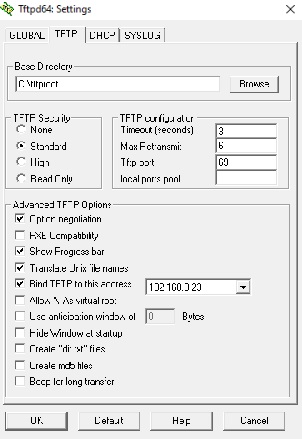
In some cases, there is still no response after the factory default or if the firmware upgrade was incomplete/corrupt. The base needs to be put in recovery mode and is look for a tftp from 192.168.0.23.
-release the button. (if that doesn't work, try when only 2 led's light up and release the button)
-wait about 10 minutes to be sure.
-the BASE unit should upgrade the firmware, reboot and be accessible at: 192.168.0.100 (You can follow along in the TFTP log. It will show activity so you know if it is working)
The 'grep' command searches for the word schema as in information_schema. No real sql query searches for this. It is always an sql hacking attempt.
The files we are searching is 'access_log*' which means search through all the access logs that we have. For me, that is usually around 4 months of data. That is a fairly good data set.
The 'cut' command chunks up the data. The '-d' part tells how to chunck the data; by a space character. The '-f 2' tells what data to collect; the second item in each line.
================================================================================= 1-Optimize-WsusServer will automatically set some configuration in IIS. This is why it is run first.
-select Products All Developer Tools, Runtimes and Redisributables Office Dictionary Updates Microsoft 365 Apps/Office2019 New Dictionary Updates Office 2016 Powershell x64 Microsoft SQL Version YYYY (version depends on your environment) Microsoft SQL Version Management Studio Windows Defender Antivirus Microsoft Server Operating System 21H2 Microsoft Server Operating System 22H2 OOBE ZDP Server 2022 Hotpatch Windows 10, version 1903 and later Windows 10 Windows 11 Windows Dictionary Updates Windows Server 2012 R2 Windows Server 2012 Windows Server 2016 Windows Server 2019 Windows Server Manager Windows Server version 1903 and later
Synchronize - manually sync and set sync schedule for automatic sync.
3-Invoke-DGASoftwareUpdateMaintenance will automatically perform maintenance on the update and remove the most common items found in the plugins. .\Invoke-DGASoftwareUpdateMaintenance.ps1 -configfile .\config_wsus_standalone.ini .\Invoke-DGASoftwareUpdateMaintenance.ps1 -configfile .\config_wsus_standalone.ini #uncomment whatifpreference Plugins: Decline-Edge Decline-Office365Editions Decline-Windows10Languages Decline-Windows10Versions Decline-Windows11Languages Decline-WindowsARM64 Decline-WindowsItanium
4-CleanUP-WSUS has its own set of items: .\CleanUP-WSUS.ps1 -firstrun .\CleanUP-WSUS.ps1 -scheduledrun .\CleanUP-WSUS.ps1 -daily .\CleanUP-WSUS.ps1 -monthly .\CleanUP-WSUS.ps1 -quarterly
5-Decline-SupersededUpdates from Microsoft is published. It probably won't do anything at this point but lets run it for good measure. .\Decline-SupersededUpdates.ps1 -SkipDecline -UpdateServer localhost -port 8530 .\Decline-SupersededUpdates.ps1 -UpdateServer localhost -port 8530 #remove -SkipDecline
6-Install-Script -Name Wsus-Maintenance Wsus-Maintenance (to see the readme) Wsus-Maintenance -Run
Get-WSUSUpdate -Status Any -Approval unapproved |?{$_.products -match "2003" -or $_.products -match "2007" -or $_.products -match "2010" -or $_.products -match "2013"} |Deny-WsusUpdate -verbose #accidentially downloaded office 2003, 2007, 2010, 2013 | Get-WSUSUpdate -Status Any -Approval unapproved |?{$_.products -match "Windows 10 and later Dynamic Update" -or $_.products -match "Windows 10 and later Dynamic Update, Windows Safe OS Dynamic Update" -or $_.products -match "Windows 10 and later GDR-DU" -or $_.products -match "Windows 10 GDR-DU FOD" -or $_.products -match "Windows 10 Feature On Demand" -or $_.products -match "Windows 10 LTSB, Windows 10" -or $_.products -match "Windows GDR-Dynamic Update"} |Deny-WsusUpdate -verbose
7-UpdateServices (builtin when installing WSUS) -Get-WsusServer | Invoke-WsusServerCleanup -CleanupObsoleteComputers –CleanupObsoleteUpdates -CleanupUnneededContentFiles -CompressUpdates -DeclineExpiredUpdates -DeclineSupersededUpdates -created wsus-cleanup.ps1 -set as Scheduled-Task
Sometimes this needs to be run one at a time: Invoke-WsusServerCleanup -CleanupUnneededContentFiles -CompressUpdates Invoke-WsusServerCleanup -DeclineSupersededUpdates Invoke-WsusServerCleanup -DeclineExpiredUpdates Invoke-WsusServerCleanup -CleanupObsoleteComputers Invoke-WsusServerCleanup -CleanupObsoleteUpdates -CompressUpdates
8-Powershell OneLiner: Get-WSUSUpdate -Classification All -Status Any -Approval AnyExceptDeclined ` | Where-Object { $_.Update.GetRelatedUpdates(([Microsoft.UpdateServices.Administration.UpdateRelationship]::UpdatesThatSupersedeThisUpdate)).Count -gt 0 } ` | Deny-WsusUpdate
WSUS complete setup. While there is another article that preceeds, this article tries to encompass the full WSUS setup, configuration, maintenance and common problems that you may run into.
As a refresher, you can see your PowerShell modules with: get-module
Or see the installed PowerShell modules: get-installedmodule
Or see all the available PowerShell moduels: get-module -listavailable
UpdateServices
There is a built-in PowerShell module that installs with WSUS called UpdateServices. This module can be used for many WSUS commands.
To see the commands: get-command -module UpdateServices
The main command is: Get-WSUSUpdate Get-WSUSUpdate -Classification Critical -Status Any -Approval unapproved |get-member Get-WSUSUpdate -Classification Critical -Status Any -Approval unapproved |select products -unique
Classifications
WSUS updates has Classifications.
There is a slight variation in Classifications from WSUS server in certain places: [enum]::GetNames([Microsoft.UpdateServices.Commands.WsusUpdateClassifications]) Classification only includes: All Critical Security WSUS
This is different than the WSUS Classifications listed here as "Root Categories": Get-WsusServer |Get-WsusClassification Classifications includes: Applications Critical Updates Definition Updates Driver Sets Drivers Feature Packs Security Updates Service Packs Tools Update Rollups Updates Upgrades
Each update also has a Category. To see the Language Packs from the client: Get-WindowsUpdate -Category "Language packs"
When a WSUS client asks for an update, it can error out (0x80244010) if the transfer is over the limit.
To set the limit to unlimited: sqlcmd -S np:\\.\pipe\MICROSOFT##WID\tsql\query USE SUSDB GO SELECT MaxXMLPerRequest from tbConfigurationC GO UPDATE tbConfigurationC SET MaxXMLPerRequest = 0 GO
To reset to the default value: UPDATE tbConfigurationC SET MaxXMLPerRequest = 5242880 GO
Language Pack Configuration Caveat
WSUS console shows Language Pack (ie KB2839636, KB3012997) not installed.
This is working as designed. Whether to install a language pack is up to each user account to decide if the a language pack should be installed or not.
As a result, language packs should not be deployed by WSUS as there will non-compliant reports coming back to WSUS.
The following will deny all Language Packs in WSUS that have not been Approved: get-WsusUpdate |?{$_.update.title -like "*Language Pack*"} | Deny-WsusUpdate
If the Language Packs were already Approved, then the following will deny all Language Packs: get-WsusUpdate -Approval Approved -Status FailedOrNeeded |?{$_.update.title -like "*Language Pack*"} |Deny-WsusUpdate (This works because we know that update package is failing/needed.)
Note that the Language Packs are not included in the normal update process. Meaning if you search for updates on the Windows client, the Language Pack does not show. But it will show as missing on the WSUS report.
3-WSUS Maintenance
If this is your first time, Maintenance can be complicated as there are many ways to go about doing so without any real official way of doing so from Microsoft. The Microsoft published articles on WSUS are questionable as well. There are simply better methods.
You can fiddle around with WSUS for hours/days/weeks/months and even years. Sometimes I find some people who equate WSUS with being a sysadmin.
For a "speedrun" to get WSUS working as fast as possible, there is a script in PowerShell Gallery called Wsus-Maintenance and Invoke-DGASoftwareUpdateMaintenance.ps1
Install-Script -Name Wsus-Maintenance Wsus-Maintenance (to see the readme) Wsus-Maintenance -Run
get-wuinstallerstatus get-wurebootstatus get-wuinstall -verbose (This is the same as: Get-WindowsUpdate or Get-WindowsUpdate -Verbose) get-wuinstall -verbose -install (This is the same as Install-WindowsUpdate)
get-command -module pswindowsupdate
Windows Update Repo
To see the source repository of the updates (ie local intranet WSUS server or public internet Microsoft server): Get-WUServiceManager
To set the source of the update to the public internet Microsoft Server: Get-WindowsUpdate -MicrosoftUpdate
Extra
To search for a specific update: Get-WindowsUpdate -KBArticleID KB982861 Get-WindowsUpdate -KBArticleID "KB5002324", "KB5002325" Get-WindowsUpdate -KBArticleID KB982861 -Verbose
To get the current Job: Get-WUJob
To get the history: Get-WUHistory | ?{$_.Description -like "*Update*"}
5-WSUS Server Reset
Reset WSUS Pool
If WSUS Server Keeps Stopping
Internet Information Services (IIS) Manager -> Server -> Application Pools -> Select “WSUSPool” -> Actions Advanced -> Recycling -> change “Private Memory Limit (KB)“.
-set to 0 (no limit). -started WSUSPool. -started Windows WSUS service. -started cleanup.
Reset WSUS Server
If you run into WSUS problems you can reset the WSUS server:
net stop wsusservice "c:\Program Files\Update Services\Tools\wsusutil.exe" reset net start wsusservice
via log inspection: wuauclt /detectnow get-content %SystemRoot%\WindowsUpdate.log get-content %SystemRoot%\WindowsUpdate.log |findstr /i "server:" If the intranet WSUS server shows, then it is reaching the correct server.
If not, then there might be a connectivity issue with the Anonymous user account called IUSR: IIS > Virtual Directory > SelfUpdate > Authentication > Enable Anonymous Authentication IUSR is the anonymous/www user (No longer uses the IUSR_<MachineName>)
Check the Windows Client is Updating
Now check what happens when the client tries to update:
The update error 0x800f0823 usually happens when a recent servicing stack update (SSU) is missing. The SSU is the update agent. Confirm by looking at the CBS log: get-content %SystemRoot%\Logs\CBS\CBS.log |findstr /i hresult get-content %SystemRoot%\Logs\CBS\CBS.log |findstr -wait -tail 25
This is where PDQ can help and be part of the patch management. PDQ can auto download and push the monthly rollup to the clients. But it's 2023 and the Windows Server 2012 R2 hasn't been patched since... well, you know. So it needs a bit of help.
Service Stack Update (SSU)
The Service Stack Update is the update agent itself. So it is kinda like updating YUM. Let's update the SSU.
The Windows Update needs reset. First let's verify the OS: DISM /Online /Cleanup-Image /RestoreHealth reboot It may reboot on it's own a second time. sfc /scannow reboot
0x80244010 - Just Retry a Bunch of Times
Finally, start the update process again and it should go through. If the error message is 0x80244010, then just RETRY. You might have to RETRY about 10 times. You are hitting the limit on what can be done on WSUS (200). RETRYING picks up where it left off. This is why it needs to be done multiple times.
If configurated correctly, this shouldn't happen. See the 2-WSUS Configuration -> Increase-the-transfer-request-quantity
Force Windows Client Report to WSUS
Sometimes the Windows Client won't report to WSUS. Let's force it:
Or if you need to fully reset the WSUS client: -remove WSUS client from WSUS -on the WSUS client, remove the settings and reset the Update Components: echo y |REG DELETE "HKLM\SOFTWARE\Microsoft\Windows\CurrentVersion\WindowsUpdate\" /v SusClientId echo y |REG DELETE "HKLM\SOFTWARE\Microsoft\Windows\CurrentVersion\WindowsUpdate\" /v SusClientIdValidation Reset-WUComponents WUAUCLT /ResetAuthorization /DETECTNOW
Someone suggested that patch Tuesday doesn't exist because patches are sometimes released afterwards and that Tuesday isn't the same across the globe. It was a very long thread and there is some validity. Even VMware went to UTC on the logs and doesn't allow it to be changed to the local timezone. Probably smart. In any event, here is some date/time to narrow Windows Update no matter where you are in the world: (get-date).ToUniversalTime() (get-date).DayOfYear [int](Get-Date -UFormat %s -Millisecond 0) ([DateTimeOffset](Get-Date)).ToUnixTimeSeconds()
I spent some time in compuer maintenance. This is thousands of computers across multiple locations on the globe. If I have to physically visit a computer, I've lost. The goal is to be able to provide network administration to all computers without ever having to physically visit on-site.
Because of this goal, gathering information is important.
WMIC is one tool for this. Here are some nice cheatsheet items:
Get the video card information/display-adapter information: wmic path win32_VideoController get name
Get the video card driver: wmic path win32_VideoController get driverVersion
Get the motherboard information: wmic baseboard get product
Get the onboard devices: wmic onboarddevice get description
Get the serial number in the bios: wmic bios get serialnumber
Get the bios version: wmic bios get smbiosbiosversion
Client Dell Latitude Laptop E5570 boots past the Dell logo (bios logo) and gets a black screen and can see nothing. The computer responds to a remote support software. I see nothing but I can run commands via command line (cmd) and get a response.
-start the command line interface.
-type: sc config "appreadiness" start= disabled
-type: shutdown -r -t 3
This will disable the appreadiness service and restart the computer. The computer should boot to the login screen without difficulty.
If I didn't have the command line interface and simply has a laptop at home, I would try to get into safe-mode and then run the commands there:
Installation is easy but the installer doesn't put the directory in the PATH. Until that time, you will have to type in the whole path to run the program: C:\Program Files\gs\gs9.21\bin\gswin64c.exe
Adding to the PATH allows you to run the program by just using: gswin64c.exe
To change the PATH temporarily, you can add to the PATH by typing in the command line: set PATH=%PATH%;C:\Program Files\gs\gs9.21\bin\;C:\Program Files\gs\gs9.21\lib\
Or you can:
-right-click MY-COMPUTER/
-click PROPERTIES
-click ADVANCED-SYSTEM-SETTINGS
-click ENVIRONMENTAL-VARIABLES (at the bottom-right).
-in the lower section called "SYSTEM VARIABLES", find PATH
-click EDIT
-find VARIABLE VALUE
-keep everything there
-go to the end of the value
-add the following: ;C:\Program Files\gs\gs9.21\bin\;C:\Program Files\gs\gs9.21\lib\;
NOTE: do not remove any of the existing values.
RUNNING GHOSTSCRIPT
The idea here is that Ghostscript will create PDF's for you without step-by-step interaction. Let's say you have a directory of PDF that somebody scanned at 1200dpi with each PDF at 10MB. After time, this directory becomes entirely too large. We can use Ghostscript to re-compress the PDF's by 90% and take each PDF down to 1MB.
Ghostscript is suite of commands and not just one command. The command we are interested in is: ps2pdf
To run for a single file: ps2pdf -dPDFSETTINGS#/ebook C:\path\to\input\file.pdf c:\path\to\output\file.pdf
Here is a script to run for an entire directory. Create the batch file and name it compress-all.bat. Put the batch file in the directory for which you want to compress files. Run the batch file from command line. It will create a "compressed" folder and put a copy of the compressed files in there: =====
@echo off
setlocal
set GS_OUTPUT_DIR=compressed
mkdir %GS_OUTPUT_DIR%
for %%i in (*.pdf) do ps2pdf -dPDFSETTINGS#/ebook "%%i" "%GS_OUTPUT_DIR%\%%i"
Last Updated on Wednesday, 13 September 2017 11:09
Branch Office Domain Controller Active Directory isn't working when the HQ DC AD is offline. Hurricane Irma knocked power out at the HQ location. The HQ DC AD server was shut down to prevent any issues.
Branch offices across North America have DC's, AD's and DNS.
When users go to a local server share, they get the login box with an error message: "Search Results The system cannot contact a domain controller to service the authentication request"
When I go to the AD Users & Computers, I get an error message: "Active Directory Naming Information Could Not Be Located"
The Users & Computers tree on the left hand side has an X for "Active Directory Users and Computers" and the center box is blank.
DIAGNOSTICS
I make sure DNS is setup correctly: IPV4: 10.162.99.99 DNS1: 10.162.99.99 (SELF, always should be this way) DNS2: 10.162.55.55 (HQ1) DNS3: 10.162.55.56 (HQ2)
========== I make sure the FORWARDERS are set correctly: 4.2.2.2
Positive reply. So I know the domain and AD exists. I just can't reach it.
========== Next, I try a dcdiag /fix: dcdiag /fix
Reply: <snip> "Warning: DcGetDcName(GC_SERVER_REQUIRED) call failed, error 1355 A Global Catalog Server could not be located - All GC's are down. </snip>
Bummer... it cannot reach a Global-Catalog. This is certainly the heart of the issue.
========== Next, I check to see if my server is a GLOBAL-CATALOG server: repadmin /options *
Reply: Repadmin: running command /options against full DC DC-01.my-domain-here.com Current DSA Options: IS_GC
Well, I now know that the server I am using is a GLOBAL-CATALOG.
========== Next, I check to see what servers are global catalog servers as stated in DNS: nslookup gc._msdcs.my-domain-name-here.com
There is certainly more to this. The AD isn't setup correctly. Active Directory uses the _msdcs.my-domain-here.com sub-domain to host SRV records. These records are not automatically updated, even in 2012-R2. Consequently, there may be outdated servers listed. In addition, the new servers will be missing.
You can find the domain and the servers here:
DNS -> DC-SERVER-01 > FORWARD > my-domain-name-here.com > _msdcs
Since this list is not updated automatically, the old servers are not available to provide the info. The new servers are not in the list since it is not added automatic. That means that the only server in the list was the original server. Once that server is no longer available, AD is unavailable. So much for fault tolerance.
Exchange 2013 Error: The global catalog verification failed
Working on Exchange 2013 and adding permissions to a mailbox, I get:
Active Directory operation failed on exchange.domain.tld. This error could have been caused by user input or by the Active Directory server being unavailable. Please retry at a later time. Additional information: Additional information: The global catalog verification failed. The global catalog is not available or does not support the operation. Some part of the directory is currently not available. Active directory response: 000020E1: SvcErr: DSID-03200672, problem 5002 (UNAVAILABLE), data 0
Here's how to fix:
-delete the files in: C:\Users\administrator\AppData\Roaming\Microsoft\MMC (or C:\Users\administrator.<foo>\AppData\Roaming\Microsoft\MMC)
-re-run the command: Add-MailboxPermission foo.user -User foo.user2 -AccessRights FullAccess -InheritanceType All
The Trust Relationship Between This Workstation and the Domain Has Failed
Reset-ComputerMachinePassword
Just as a USER-ACCOUNT is an object in AD, a COMPUTER-ACCOUNT is an object in AD. This has a password but the password isn't working. Let's reset the password.
$credential = Get-Credential (enter the domain admin account when prompted)
It will come back either TRUE or FALSE. If it's false, let's try and repair it.
-login to localadmin-account on local system and type: Test-ComputerSecureChannel -repair
-if that didn't work, try: Test-ComputerSecureChannel -Repair -Credential (Use the username/password of the domain admin account)
-if you need to run remotely: Invoke-Command -ComputerName REMOTE-COMPUTER-NAME-HERE -ScriptBlock { Test-ComputerSecure Channel } -Credential (Get-Credential -UserName 'admin-here' -Message 'User')
-if you need a one-liner: Test-ComputerSecureChannel -Repair -Credential (New-Object System.Management.Automation.PSCredential 'domain\adminaccounthere',(convertto-securestring $('password-here') -asplaintext -force))
What I usually find is that I can't run the commands remotely because the trust is broken. And when I run locally, it simply runs "False."
So I copy a powershell script onto the computer with the file name rejoin-domain.ps1
ForensiT User Profile Wizard is a great tool when you are migrating from domainold.tld to domainnew.tld.
The free version is a manual process but the corporate version is an automated process that helped migrate an entire office.
Cost
The cost is around $2 USD per computer. So for 100 computers, the cost is $200. Priced correctly on the time you will save.
Installation
Simply download and install. It will install in c:\program files\ForeensiT\Profile Wizard\.
A license file will be emailed to you. Save the file in the location: C:\ProgramData\ForensiT\User Profile Wizard Corporate\Deployment Files\
Run The Wizard
Running the wizard will create a CONFIG file. The config file is an xml file that is editable by any text editor. The options are pretty standard. You will be able to get through them. Very simple, nothing complex. I think the only gotchas are:
-reboot without notice (as you'll be doing this off-hours).
-create a SINGLE-DEPLOYMENT-FILE.
When finished. It will save the CONFIG file in: C:\ProgramData\ForensiT\User Profile Wizard Corporate\Deployment Files\
Edit the Config File
Edit the CONFIG file at C:\ProgramData\ForensiT\User Profile Wizard Corporate\Deployment Files\. Run the PROFWIZ.EXE again to edit the file you just created.
You need to edit a few items to get it to work the way we want it to. Namely, the following:
<! -- Corporate Edition Settings -- > < AdsPath > OU=Workstations,OU=Office,DC=olympic,DC=domain-name,DC=tld < Silent > True < NoMigrate > False < NoReboot > False < RemoveAdmins > True < MachineLookupFile >\\server\share\migrate-pc-file.csv < Log > \\sever\share\Migrate.Log < ScriptLocation > \\server\share\Migrate.vbs (yes, change this even if it says not to. I find having the server share is more accomodating)
<! -- Settings for migrating all profiles -- > < All > True < Exclude > ASPNET,Administrator
< ProtocolPriority > LDAP < DC > \ \ britannic2.britannic.domainname.tld
< ProfBatRetryLimit > 3 < ProfBatRetryDelay > 2
Most of the key/values are self explanitory. To choose which domain controller you want to join, the ProtocolPriority must be set to LDAP and the DC setting specifies the FQDN of the domain controller (make sure you precede with the "\\").
Create Migrate-PC.CSV File
A .csv file needs to be created. Column A is the current computer name. Column B is the new computer name. If the names are the same then the computer name doesn't change.
Save this file in \\server\share\migrate-pc-file.csv
Save the single-deployment-file in the same location: \\server\share
-save it in:C:\ProgramData\ForensiT\User Profile Wizard Corporate\Deployment Files\
-make sure you are still on the domainold.tld and logged in a users at domainold.tld
-reboot all the computers for a fresh start (use PDQ inventory if you need to do this automatically).
-click START > PROGRAM-FILES > FORENSIT > COMMAND-LINE (you do not need to run this as-admin)
-a cmd prompt opens
you should be at: C:\ProgramData\ForensiT\User Profile Wizard Corporate\Deployment Files\
-type: profbat.exe
-hit enter
-wait... It will give some feedback but not much.
-it will automatically go through all the computers in the .csv list, migrate all the profiles and join the new domain and reboot the computers.
-once rebooted, everyone can use their new login at newdomain.tld
-AWESOME!
-the logs should be at \\server\share
-each pc will have it's own migration log.
2- manually from admin workstation:
-click START > PROGRAM-FILES > FORENSIT > COMMAND-LINE (you do not need to run this as-admin)
-a cmd prompt opens
-type: profwiz.exe /COMPUTER computer-name-here
-hit enter
-you will see: >
-wait... It won't give any verbose information.
-soon it will go to a new line once finished and you will see: > >
-the logs are the place you indicated (which should be \\server\share\).
3-manually at admin workstation after domainnew.tld
If for some reason, the pc's are joined to the domainnew.tld without the profiles being migrated, don't worry as it is pretty much the same process. The most important part is the first step:
-make sure you are on the domainnew.tld and logged into a user with domainnew.tld
-click START > PROGRAM-FILES > FORENSIT > COMMAND-LINE (you do not need to run this as-admin)
-a cmd prompt opens
-type: profwiz.exe /COMPUTER computer-name-here
-hit enter
-you will see: >
-wait... It won't give any verbose information.
-soon it will go to a new line once finished and you will see: > >
-the logs are the place you indicated (which should be \\server\share\).
4- manually at the client computer:
-save the profwiz.exe, profwiz.config, migrate.exe, migrate.vbs at the share: \\server\share\
-edit the profwiz.config
-change: <GUI> True
-save
-run: migrate.vbs
-it should show the progress and migrate all the profiles over.
-reboot the computer.
5- automatically via logonscript
-save the profwiz.exe, profwiz.config, migrate.exe, migrate.vbs at the share: \\server\share\
-add the migrate to the login-script: \\server\share\migrate.vbs
-login to the client pc. It will begin the migrate process and skip if has already been run (of course it won't be referenced once the computer is joined to the new domain).
Final Thoughts
That's it! That should handle all the scenarios that will work. Of course, there are many scenarios that will NOT work. Most of the errors will be trying to move a client-pc on domainold.tld by using an admin-workstation already joined to domainnew.tld (and logged into domainnew.tld user). Or vice-versa. If you are making changes, the client-pc and the admin-pc must be on the same domain (at least for it to be easy).
In any event, in all scenarios I did not visit a single client pc. Everything worked with a little thinking. This should be built into Windows Server.
For the curious... Yes, it is possible to have 2 domains on the same network subnet at the same time. But there can only be one DHCP and both domains should reference the other in the DNS -> FORWARD LOOKUP ZONES. Simply add the other domain and IP address of the other domian server.
Couldn't get email from certain outside domains. Further investigation revealed that this is only happening from domains hosted at Office365. The error message in Mimecast is "Null result from socket."
This means that there is no response from the internal email server when Mimecast tries to deliver the message. That means it is being blocked by the WatchGuard.
WatchGuard logs show, something about the header size being 20656 and "header-line too large."
So WatchGuard is blocking anything where the header is too large.
You can see above the "Maximum email header size" is at 20,000 bytes.
-type: set-aduser $username -homedrive Z -homedirectory \\<server-name>\users$\$username -scriptpath logonscriptfilenamehere
$username should be left as is. The folder will automatically be created and named exactly as the username! Too bad it doesn't automatically create the folder permissions like the GUI does in AD.
-to set the values, type: $usernames = (get-aduser -filter * -searchbase "ou=<location>,ou=<users>,dc=<domain-name>,dc=com" -properties samaccountname |foreach { $_.samaccountname }) foreach ($username in $usernames) {set-aduser $username -homedrive Z -homedirectory \\<server-name>\users\$username -scriptpath logonscriptname}
-to set the permissions, type: $userfolder = "\\<server-name>\users$\" foreach ($username in $usernames) {icacls ("$userfolder" + "$username") /grant ("$username" + ':(OI)(CI)F') /T}
!!!Please double-check and triple-check to make sure you have the correct punctuation above. This can be a career-changing event if you get this wrong!!!
Users Complain that the HomeDrive is Not Available in VPN Connections
Since the user logs in without being connected to the domain, the homedrive is not setup correctly. You can use the following GPO to get connected so that the homedrive is also a mapped drive which will be available upon vpn.
-rdp into dc1.olddomain.tld (dc1 is your domain controller) -go to dns tree. -add new FORWARD-LOOKUP-ZONE. -right-click FORWARD-LOOKUP-ZONE. -click NEXT > NEXT > NEXT -type in newdomain.tld -click NEXT > NEXT > FINISH (this is your new domain name) -cd c:\installs -rendom /list -edit c:\installs\Domainlist.xml -replace olddomain.tld with newdomain.tld (in 4 places. The last place doesn't have a .tld) -rendom /upload -rendom /prepare -rendom /execute -reboot -netdom computername dc1.olddomain.tld /add:dc1.newdomain.tld -netdom computername dc1.olddomain.tld /makeprimary:dc1.newdomain.tld -reboot -gpfixup /olddns:olddomain.tld /newdns:newdomain.tld -gpfixup /oldnb:olddomain /newnb:newdomain -rendom /clean -rendom /end -remove olddomain.tld from dns tree. -final reboot to make sure it survives reboot.
-go to DHCP tree. -go to ipv4 > server-options -change dns domain name to newdomain.tld -restart DHCP service -you have have to change each scope > scope-options
Client computers will need to be rebooted twice. -once dc is rebooted, wait 15 minutes. -reboot client computers. -wait 15 minutes. -reboot client computers again.
Client computers suffix should be changed automatically.
If you need a regedit to change the primary dns suffix when membership changes: echo y | reg add "HKLM\SYSTEM\CurrentControlSet\Services\Tcpip\Parameters" /v SyncDomainWithMembership /t REG_DWORD /d 00000001
If you have problems with a client pc joining the new domain, you can: -netdom remove oldpc /Domain:olddomain.tld /Force -reboot -join newdomain.tld
There is a link between AD and EXCHANGE. But it isn't a hard link. Meaning that just because you create an AD account doesn't mean an Exchange account will be created.
Conversely, if you delete an AD account doesn't mean that the EXCHANGE account is deleted. Rather it is DISCONNECTED. It remains this way for 30 days. Then it is deleted.
Sometimes if you delete the AD account and the EXCHANGE account doesn't show DISCONNECTED until the MAILBOX-DATABASE runs its regular maintenance.
MegaRaid controllers can be confusing and difficult because of the companies that keep on merging together. Currently, Broadcom maintains LSI equipment. But, in my opinion, they are being difficult recently and forcing you to get support through the OEM's. OEM's like Supermicro don't have much information either.
In any event, you can control the MegaRaid cards either:
-upon boot up with a CTRL+H
-or through the MegaRaid Management Software
Again, I would list more but this web site has more information than we can provide:
Migrating Active Directory Users and Merging Domains
Imagine you are part of a company. That company is being bought out by a larger company. To ease feelings, new email accounts are created at the larger company (ie
This e-mail address is being protected from spambots. You need JavaScript enabled to view it
). The computers remain on the domain of the smaller company (ie @branch.tld).
Now comes a point in time where the larger company wants to join the domains together. What are the options? How do you handle this situation?
Very good questions.
OPTION-1: 1 Forest & 2 Domains
A forest is a group of domains. It is possible to keep the domains separate but still have the same forest. @hq.tld and @branch.tld will live happily together and have a trust-relationship.
Two users would still exist. For example,
This e-mail address is being protected from spambots. You need JavaScript enabled to view it
and
This e-mail address is being protected from spambots. You need JavaScript enabled to view it
would still exist which is confusing for people.
OPTION-2: Parent-Child Domain
The parent domain is hq.tld. It is possible to have a child domain such as branch.hq.com (or is you prefer, us.company.tld).
Two users would still exist. For example,
This e-mail address is being protected from spambots. You need JavaScript enabled to view it
and
This e-mail address is being protected from spambots. You need JavaScript enabled to view it
would still exist which is confusing for people.
OPTION-3: Flat & Import
This consolidates everything down. It gets rid of messiness and flattens the company to 1 domain of hq.tld.
Only one user exist per person and this makes sense for people.
When you start an email and you start to type in an email address, OUTLOOK will show a drop-down list of email addresses you've written to before.
This is an AUTOCOMPLETE-list (This is not an address-book or contact-list). What's surprising to me is that, to users, this list is more important than the contact-list or address-book. Probably because it automatically show.
What's more suprising is that there is no connection between the contact-list, address-book or AUTOCOMPLETE-list.
History Autocomplete
The AUTOCOMPLETE file used to be called the NK2 file. There is a ton of information about the NK2 file.But it's 2017 and closing to 2018, the NK2 file is no longer relevant. The data on the internet is becoming long in the tooth. So much bad information.
Location Autocomplete
In any event, the AUTOCOMPLETE list in OUTLOOK 2016 is here:
Before you do anything, copy this file as a backup!!! The file size is small and can be copied in less than 5 seconds. This file is known to be volitile and can go from a large size down to zero without warning. This is why you want a backup.
Transfer Autocomplete
If you have an old computer and OUTLOOK setup and your new comuter and OUTLOOK setup doesn't have the list, you can:
-close OUTLOOK.
-copy this file to the new computer.
-place in the following directory: C:\Users\foo.user\AppData\Local\Microsoft\outlook\RoamCache\
-rename the current DAT file to something like: Stream_Autocomplete_0_A603AC42FB764D4C9662D971D85637C2.dat.old
-change the wanted DAT file (with all the info in it) name to the current name, something like: Stream_Autocomplete_0_A603AC42FB764D4C9662D971D812345.dat
Export Autocomplete
You can export the names in the DAT file. Despite the name, the NK2EDIT is the best tool for this:
(It should automatically populate with your current AUTOCOMPLETE file).
-click FILE > SAVE-AS
This will save the file as an NK2 file that can later be imported somewhere else.
Import Autocomplete
This is for a fresh OUTLOOK with no AUTOCOMPLETE.
-open the NK2 from the old system.
-click FILE > EXPORT-TO-MESSAGE-STORE
This will overwrite the existing AUTOCOMPLETE with the items from the old AUTOCOMPLETE.
Merge Autocomplete
This is to merge old AUTOCOMPLETE with the current AUTOCOMPLETE.
-open the NK2 from the old system.
-click FILE > IMPORT-FROM-MESSAGE-STORE
(This will merge the current AUTOCOMPLETE with the info from the older AUTOCOMPLETE.)
-click FILE > EXPORT-TO-MESSAGE-STORE
This will overwrite the existing AUTOCOMPLETE with the items from the old AUTOCOMPLETE.
Rebuild Autocomplete
Let's say that the AUTOCOMPLETE file is gone. For whatever reason, it is emtpy (I'm bashfully looking away, avoiding eye contact). But you still have your PST/OST file. Can't you just rebuild the AUTOCOMPLETE with information that is in the SENT-ITEMS folder?
This will allow you to rebuild the AUTOCOMPLETE with items from your SENT-ITEMS folder. This is probably what you want; as everyone you've written an email to will automatically be placed in here. In addition, you can place a checkmark to items from your INBOX as well.
Fiddle around with the settings and when you are satisfied, click FILE > EXPORT-TO-MESSAGE-STORE.
Edit the AUTOCOMPLETE
-open NK2EDIT and edit away.
-be sure to FILE > EXPORT-TO-MESSAGE-STORE.
Final Thoughts
In short, this is an oldy but goody. Considering the importance of AUTOCOMPLETE items to users, you wonder why this isn't built directly into the OUTLOOK.
NOTES
There is a POWERSHELL script that didn't exactly work for me but it looks promising if could be updated:
If that doesn't work, you might have an OFFICE365 account conflict. You may have one OFFICE365 account for WORD, EXCEL, OUTLOOK and another OFFICE365 account for EMAIL.
-click START > SETTINGS > ACCOUNT
-click EMAIL-&-APP-ACCOUNTS (on the left-hand side).
-remove the OFFICE365 account that is only for email (leaving the OFFICE365 account that is for WORD, EXCEL, etc or the one that you use to login to the computer [ie same as your username]).
-make sure the correct DATA-FILE is set as the DEFAULT (see above).
-open OUTLOOK
Office Update
If that doesn't work:
-click START > SETTINGS
-click UPDATE-&-SECURITY
-click CHECK-FOR-UPDATES
-install any updates and restart the computer.
Redo
If that doesn't work, you've probably spent too much time on this:
Exchange could not load the certificate with thumbprint. Or as the warning message states in the logs:
Microsoft Exchange could not load the certificate with thumbprint of 59235427B7C322A8CFD7E1EB939445A2EAF9F670 from the personal store on the local computer.
Get the information
There's a few ways to get the information to see the current certificate list.
First is through the Exchange Management Shell (EMS):
-type: get-exchangecertificate
You can see the same list in the Exchange Admin Center (EAC):
EAC > servers > certificates
You can also see the same list in Internet Information Services (IIS):
-click server-name (on the left-hand side).
-click SERVER-CERTIFICATES (on the middle section).
Once you have the information displayed, find the thumbprint of the certificate you are using for email.
Find All Distribution Groups A User Is A Member Of. I hope that makes sense. Let's say you have a user name: foo.user. What groups is foo.user a member of?
Since the DistinguishedName is used, it makes it nearly impossible to use the command unless you keep it in a handy note somewhere. Instead, this may be easier:
-delete anything else that looks like it belongs to Lightroom in: /Users/<username>/Library/Preferences/
-delete anything that looks like it belongs to Lightroom in: /Users/<username>/Library/Preferences/Adobe/
-delete anything that looks like it belongs to Lightroom in: /Users/<username>/Library/Application Support/Adobe/
-delete anything that looks like it belongs to Lightroom in: /Users/<username>/Library/Caches/Adobe/
-open LIGHTROOM
-click LIGHTROOM > PREFERENCES > GENERAL.
-uncheck "Select the current/previous import collection during import."
-click PERFORMANCE (at the top).
-uncheck "Use Graphics Processor."
-make sure the import folder that it is trying to import from exists. In other words, sometimes the last import location is a external drive that doesn't exist anymore. Change it to somewhere neutral like the DESKTOP.
-move the program to: C:\Program Files (x86)\DeskLock
-right-click DeskLock.exe
-click CREATE-SHORTCUT
-move the shortcut to: C:\Users\$username\AppData\Roaming\Microsoft\Windows\Start Menu\Programs\Startup (where $username is your-username that you use to login to your computer)
-arrange the icons the way you want.
-reboot the computer.
Having various clients, it's always interesting to see different perspectives. There is a class of client that approaches computers differently than I do. One question this class asks is, "How do I lock my icons on my DESKTOP?"
The thinking is that the DESKTOP is the User Interface (UI). This UI should not be changed unless given specific permission and instructions to do so. Changing it without permission or instruction is nearly a violation of human rights.
With as much attention that UI gets (and rightly so), one would think that the DESKTOP arrangement is utmost important rather than being flippantly changed every time a feature update comes along. One Operating System that I know of (Ubuntu) went so far as to lock the UI so that the TASKBAR and START-BUTTON are locked on the left hand side of the screen. And, of course, Mac OSX has always had the TASKBAR and APPLE menu at the top.
A person unfamiliar or afraid of computers will not want anything changed. And as we get older, we have the tendency to want everything to stay the same. Don't have 2 buttons if you can have one. Even Mac mouses have only 1 button until told otherwise.
Referring to Windows 10 annoying habit of re-arranging icons, as one client put it, "It's like someone coming into your home and rearranging your furniture without asking."
Further more, looking at the TRACKING diagnostics, you see the "Rejection Information" states, "Failed Known address verification."
The issue is that the email address does exist in Exchange. What gives?
Solution
Well Mimecast has a few settings to receive email. This setting is on the domain/internal-directory level (administration > directories >internal-directories).
There are a few options. One is "Accept emails for known recipients only." Accordingly, each user that you want to receive email for must be added to Mimecast. The first time a user sends an email outbound via Mimecast a user will be created.
Since groups don't send email (typically), a Mimecast account is never added. So it's possible that there could be an email address in EXCHANGE that is not in Mimecast.
Fortunately, users can also be added to Mimecast through:
import (ie import a list)
manually
AD sync
If there are not a bunch of groups, it's probably easiest to just add the group email addresses manually.
Generating barcodes is somewhat easy but can get complicated for various reasons. Before we get to it, know that there are several types of barcode formats. We're focusing on linear barcodes, CODE 39 and CODE 128.
Code 39 (or Code 3 of 9)
Code 39 is simple. In short, surround the text with asterisks and change the font to 3-OF-9.
type what you want in a barcode in column A: (ie ABC123)
create a simple formula (use the CONCAT function) in column B that surrounds the text with asterisks: (ie *ABC123*)
create a simple formula in column C that simply mirrors column B.
change the font on column C to font 3-OF-9.
that should do it!
-in FILEMAKER
create a field called INFO as text.
create a field called INFO_BARCODE as calculation.
create a calculation that concats the INFO field surrounded by asterisks ("*" & INFO & "*").
put the fields on the layout.
on the INFO_BARCODE field, change the font to 3-OF-9.
Code 128
Code128 is a little more challenging than Code39. You would want to use Code128 when you need a compact barcode in a small space where Code39 will not fit.
The challenging item with Code128 is that you need to translate what you want in a barcode into a barcode-string that contains accent letters.
copy the plugin file called IDAutomation.fmx and paste it in C:\Program Files\FileMaker\FileMaker Pro\Extensions (adjust the path to your version accordingly).
open FILEMAKER.
create a field called INFO as text.
create a field called INFO_BARCODE as calculation.
create a calculation that returns the INFO field as a barcode string. Use the custom function like so: IDAu_Code128( INFO )
the result should be calculated as TEXT (not NUMBER).
put the fields on the layout.
click FORMAT > FONTS > CONFIGURE/MORE-FONTS (at the top menu).
find CODE-128 (on the left-hand column).
click MOVE.
click OK.
select the INFO_BARCODE field.
hold CTRL and ALT keys (on your keyboard).
select the font to Code-128 (at the top).
that should do it!
NOTES:
For whatever reason, I struggled do this for days. Again, I found a bunch of misinformation or confusing documents that lead me astray. Even different/newer versions of the fonts were red herrings and did not produce correct results.
With the correct fonts, installed correctly, with the correct plugins, installed correctly, with the correct calculations, calculating correctly and the fonts configured correctly, I was finally able to do this.
A mailbox is a typical account. You have John Doe. He has an account. His account is a mailbox account. The account is
This e-mail address is being protected from spambots. You need JavaScript enabled to view it
.
Options
John works with others doing proposals. What are the options?
pseudonym
group-account
separate account
shared mailbox
outside system
Option 1 - Pseudonym (What you start out doing)
1-We can setup a pseudonym/fake-account/vanity-account. No matter what you call it, the idea is the same. It is an email address that automatically goes a real account. For example:
This e-mail address is being protected from spambots. You need JavaScript enabled to view it
automatically goes to the inbox of John Doe. This is great if only one person is responsible. But as the team grows, this becomes cumbersome.
Option 2 - Group Account (What you graduate to)
2-We can setup a group-account. This is similar to above but the email goes to more than one person. For example:
This e-mail address is being protected from spambots. You need JavaScript enabled to view it
automatically goes to the INBOX of John Done and Jane Doe. This is great if it is a small team. The problem becomes, not everyone on the group know if a response was sent. Also folder organization is different for everyone on the group. You want everyone to have the same info, and see the same responses, then see further on.
Option 3 - Separate Account (What you shouldn't do)
3-We can setup a separate account. This is a typical account but instead of assigning it to one person, you give the username/password to a group of users. For example:
This e-mail address is being protected from spambots. You need JavaScript enabled to view it
has its own inbox and several users connect to it through way of username/password.
NOTE: While this seems like a good idea, years of experience says that this is a bad, bad, bad idea. Mainly because years on down the line, you can't find out who is responsible for the account. When you check the account it has a bunch of email in the inbox that no one has checked for years. I have witnessed this countless times in many clients. Kindly convince them to do it another way or just agree with them and set it up another way. The end result will be the same as below.
Option 4 - Shared Mailbox (What you'll be required to do)
4-We can setup a shared mailbox. A shared mailbox is very similar to a separate account. The difference is that rather than handing out a username/password and letting them connect to it, you assign the account to users and it automatically shows in their folder structure on OUTLOOK as a separate INBOX. This way when five years pass, you can tell who is using the account.
Here's how:
set-mailbox foo.user -Type Shared
Great! You are almost there. Now assign permissions of the people who need to use the shared-mailbox. The people will need both FULL-ACCESS and SEND-AS permissions to control the account and send messages. There is also a SEND-ON-BEHALF option available.
NOTE: -the FULL-ACCESS permission is an EXCHANGE permission (add-mailboxpermission/set-mailboxpermission/get-mailboxpermission/remove-mailboxpermission). -the SEND-ON-BEHALF permission is an EXCHANGE key property (set-mailbox foo.user -GrantSendOnBehalfTo/get-mailbox foo.user |select GrantSendOnBehalfTo). -the SEND-AS permission is an AD permission (Add-ADPermission/get-adpermission foo.user -ExtendedRights Send-As -user user1).
Here's how to add the FULL-ACCESS and the SEND-AS permissions:
You may have to fiddle around with the add-adpermission command as it want the AD name like this, "FirstName LastName" (not the DISPLAY-NAME or ALIAS).
ANOTHER NOTE: -the command does not accept multiple values for the users. Your options are to create a group & run the command on the group (hint: do not do this), run the command separately for each user wanting access (hint: do this if there's a handful), run the command using a txt file (hint: do this if there's a bunch) or use the EAC/ECP.
You are doing great! That should just about do it.
Automapping Issues
But there's one more item to cover; AUTOMAPPING. AUTOMAPPING automatically shows the shared-mailbox to show in Outlook. This way, users do not have to manually add the account to their OUTLOOK... the shared-account automatically shows. This saves a bunch of hassle trying to get everyone to use a second account and it prevents dreaded OUTLOOK problems.
Adding the permissions above will automatically turn AUTOMAPPING on. There should be no further steps.
However, what happens if the shared-account doesn't show in OUTLOOK? What then?
Well, this seems to be an issue many run into for various reasons. So let's cover some of them.
First, there is a way to set the AUTOMAPPING off so that you can add the account manually:
Add-MailboxPermission foo.user -User user1 -AccessRights FullAccess -InheritanceType All -automapping $false
To check AUTOMAP, you have to use the Get-ADuser command (not an EXCHANGE command):
This command will show a list of accounts. If the account is in the list, then AUTOMAPPING is turned on for that account.
Second, AUTOMAPPING won't work for Organization-Managment-Administrators. This is because this group already has mailboxperissions set and it automatically includes a DENY (or DENY: True). DENY takes priority over ALLOW. There are ways to get around this but it is outside the scope of this article.
Third, AUTOMAPPING doesn't work if DNS is incorrect/not-working-the-way-that-makes-OUTLOOK-happy. For whatever reason, AUTOMAPPING works fine for locations where we have a flat domain structure (everyone is on the same domain). It doesn't work when we have separate domains (ie local computer domain is remotedomain.tld and email domain is emaildomain.tld). Again, troubleshooting this is outside the scope of this article.
Fourth, wait. For whatever reason sometimes it takes a few hours to show. Give it 24 hours before sounding the alarm.
Outlook Web Access (OWA) will not automatically map shared mailboxes the same way that the OUTLOOK app does.You will have to manually add the shared mailbox.
-login to https://login.microsoftonline.com -right-click your name (on the left-hand side). -click ADD-SHARED-FOLDER... -type the name of the account you need access to. -click on the name that shows. -click ADD -the account will show on the left-hand side.
Sent Items with Shared Mailboxes
Sent items automatically go in the SENT folder of the delegate (the person accessing the shared mailbox) and not the shared mailbox. Some people do not like this. So there is a registry edit you can do to put the sent message in the shared mailbox sent folder instead:
Option 5 - Outside System (What you should do. Hint: pick this one!)
5-The other option is to use an outside system. A customer relationship management tool or CRM. Something like Salesforce, HighRise, Zendesk-Inbox, etc (I'm sure there are others). The reason you do this is because the goal of this situation is to work together and consolidate items down to one spot. Teams try to solve this through email because that is what they are used to using as individuals. But teams need to work together.
Email is communication. Email is not issue-tracking, customer-tracking, proposal-tracking. Teams "feel" like there's a lot going on but when you look a the actual issues/customers/proposals on hand, there may not be that many. There's a lot of motion but very little movement down field.
These systems track the issues/proposals and consolidate all communication down to those issues. Suddenly, 100 emails boil down to 7 issues with a status (such as PENDING or 80%) and an assignment so you can see who (individual or team) is assigned to the issue/proposal.
Initially, you can assign issues/leads/proposals and track them, keeping the communication/email with the lead.
Eventually, you can capture metrics such as win/loss and view a pipeline of what may be coming in the near future.
To see remote desktop connections (RDP connections):
-type: query user
It will show the connection and the idle time. This way if you are sharing a username, you can see if the account has been idle so you can connect without disrupting the other person.
THEM: I get a "Windows Security" login when I try to setup Outlook. It should just pick up all the settings automatically through autodiscover after I type in the email address and the password.
ME: Who cares. Everything is working. Type it in twice and move on with life.
THEM: It shouldn't be this way. It wasn't this way at my last place. We just typed in the email address and password and everything automatically worked.
ME: Sigh. I'll look into it.
OUTLOOK ANYWHERE OPTIONS (RPC over HTTP)
Well I'm glad I did look into it. From my other articles, the fine tuning of an MS EXCHANGE system is what makes it powerful as well as difficult.
So why is OUTLOOK ANYWHERE involved? Because all versions of OUTLOOK starting with OUTLOOK 2013 communicate through OUTLOOK ANYWHERE configuration (aka RPC over HTTP).
In this instance, EXCHANGE can change the way OUTLOOK talks to it. There are three options:
BASIC: username and password is required while attempting communication with Exchange.
NTLM: the current Windows user information on the client computer is supplied through cryptography communication. If the communication fails, a prompt for the username and password is required. In theory, if the computer is joined to the domain, a username and password is not needed.
NEGOTIATE: kinda like the same thing as NTLM except it uses a more updated version.
In addition to these options, EXCHANGE can have different setting for outside the office or inside the office.
By default, EXCHANGE 2016 uses NEGOTIATE for outside the office and NTLM for inside the office.
Speaking from years of experience, web hosting is a pain. There are many reasons as to why. Most of it comes down to maintaining the OS and hardening the web app, which I love doing but both are thankless jobs.
In luie of DIY, there are some offeringth at catch my attention and I would like to try:
In a simplified logical system, there are the following: -user: a single individual. -group: more than one user.
In addition, groups are universal in the company. A group is a group. There are no group types. A group can access resources and receive email.
Windows Server
In MS world, there are more options for fine-grain control. There is a security-group to access resources and a distribution-group to receive email. (For the curious, these are the only two types of groups, there are no other types of groups.)
Let's begin, shall we.
GET-DISTRIBUTIONGROUP
To see all the distribution groups: Get-DistributionGroup |select PrimarySMTPAddress
To see all the distribution groups that receive email from the outside world: Get-DistributionGroup | ? {$_.RequireSenderAuthenticationEnabled -eq $true} | select PrimarySMTPAddress
To see all the distribution groups that receive email only from within the company: Get-DistributionGroup | ? {$_.RequireSenderAuthenticationEnabled -eq $false} | select PrimarySMTPAddress
Great! Let's move on to the AD side of the system
GET-ADGROUP
But before we do, note that typically, using a command and "|fl" will let you see all the info. On get-adgroup command, it doesn't work. You have to use:
To see all of the AD group properties: Get-ADGroup -identity "foo-group" -prop *
Also note that the get-adgroup command uses the SAMACCOUNTNAME (it does not use the NAME or DISPLAYNAME as other commands). So if you have an ad-group with the name FOO-GROUP-NAME but the SAMACCOUNTNAME is FOO-GROUP-SAMACCOUNTNAME, you have to use the SAMACCOUNTNAME: Get-ADGroup -identity "foo-group-samaccountname" -prop *
To see all the groups (both AD and distribution as all distribution groups are AD groups): Get-ADGroup -Filter * -Prop * |select name,samaccountname,mailnickname
To see AD security-groups (groups without email addresses): Get-ADGroup -filter {GroupCategory -eq "Security"} |select name,samaccountname
To see AD distribution-groups: Get-ADGroup -Filter 'GroupCategory -eq "Distribution"' -prop * |select name,samaccountname,mailnickname
ISSUES
Theoretically, this list should match the get-distributiongroup list from above. But you might notice that some distribution-groups that do not have email addresses. That's kinda strange. What gives?
Sometimes the AD distribution-group does not have the necessary info in the database. Having this info is called mail-enabled. There's even a command just to handle this.
To mail-enable a distribution group that needs it: Enable-DistributionGroup -Identity "foo-group" (NOTE: This will even work on security-groups.)
Also, there are some items in the get-distributiongroup list from above that are not in the get-adgroup command above. What gives?
Well because groups can be mail-enabled, it is possible for a security-group to be mail-enabled as well.
To see AD security-groups with mail-enabled: Get-ADGroup -Filter 'GroupCategory -eq "Security"' -prop * |select name,mailnickname
Finally as a last question, if both group-types (distribution and security) can be mail-enabled, what's the point of having group types? Good question. There isn't. It is the way the world works.
-double-click CN=Deleted Objects,DC=domain-name-here,DC=tld (on the left hand side)
A list of deleted objects will show on the left hand side and will look like this: CN=Foo User\0ADEL:d8dae83b-348c-4b48-af63-6ef9eb88b8e3,CN=Deleted Objects,DC=daknetworks,DC=com
-find the deleted user that was deleted.
-double-click on the user.
(the details of the user will show on the right-hand side)
-right-click on the user > Modify
-for ATTRIBUTES, type: isDeleted
-for OPERATION, bullet DELETE
-click ENTER
Now we have to tell AD where to restore the user.
-for ATTRIBUTES, type: distinguishedName
-for VALUES, type the original DN of the object.
You can find the last-known distinguishedName by looking on the right-hand side. It will say "lastKnownParent". Simply add the user name before. For example: CN=foo user,OU=whatever,OU=wherever,OU=allUsers,DC=daknetworks,DC=com
-for OPERATION, bullet REPLACE
-click ENTER
-checkmark EXTENDED (lower-left).
-click RUN.
The user is restored successfully to the OU you defined. You might have to re-add some info and re-enable the Exchange mailbox.
Recover Deleted Items from Exchange 2013 | Recover Deleted Items from Outlook2013 | Recover Deleted Items from Outlook 2016
DEFINITIONS
DELETE - deletes the messages from the folder. Moves the messages into the DELETED-ITEMS folder (or the TRASH folder).
RETENTION - the time that you can recover items even if the messages were permanently-deleted (or deleted from the DELETED-ITEMS folder).
DISCOVERY
Exchange 2013 will have a RETENTION time for permanently-deleted messages. This setting is on the MAILBOX-DATABASE and will apply to the MAILBOX or individual account unless the MAILBOX has its own settings.
To see the settings, first find all the MAILBOX-DATABASEs names and their retention time:
And if you need to put on a Litigation Hold; which retains all items including deleted items and original versions of modified items as well as archiving is on hold:
set-mailbox foo.user -LitigationHoldEnabled $True
Or if in ECP:
-select ACCOUNT.NAME -click MAILBOX-FEATURES (left-hand side) -scroll to see "Litigation hold: Disabled" -click ENABLE -set number of days; or leave blank for indefinite
RECOVER IN OUTLOOK 2013 | RECOVERY IN OUTLOOK 2016
-click DELETED-ITEMS (on the left-hand side). -click RECOVER-DELETED-ITEMS-FROM-SERVER (at the top).
You should see a list of the messages from the last 2 weeks.
-control-click to select the messages you want. -click OK to restore them.
It should put them back into the folder where they went missing.
Here's how to create a NIC Team/NIC Bond/Load-Balancing/LBFO setup. This setup is then used in a virtual machine enviroment for all the VM's to use.
First update drivers to INTEL newest drivers v21.1.
We will be using LBFO (LOADBALANCING-FAILOVER) which is built into Windows Server rather than INTEL ANS (Advanced Networking Services) which is built into the Intel driver. The reason for this is that ultimately there are too many issues if you do not use what is built into the Windows OS. Updates and other items will keep having trouble with INTEL ANS.
Remove Existing Settings
-remove static settings from existing nics. -remove virtual switch in Hyper-V.
Establish New Settings in PowerShell
-first, see the network adapters you have: get-netadapter -renamed nic1 to TeamNic1: rename-netadapter "Local Area Connection" "TeamNic1" -renamed nic2 to TeamNic2: rename-netadapter "Local Area Connection 2" "TeamNic2" -created nic team with name ManagementTeam: new-netlbfoteam -Name "ManagementTeam" -TeamMembers TeamNic1,TeamNic2 -TeamingMode SwitchIndependent -LoadBalancingAlgorithm TransportPorts -created virtualswitch called ConvergedNetSwitch: New-VMSwitch "ConvergedNetSwitch" -MinimumBandwidthMode weight -NetAdapterName "ManagementTeam" -click SERVER-MANAGER (the management gui in Windows Server that shows when you start the server) -click LOCAL-SERVER (on the left-hand side). -find NIC-TEAMING (at the top section) -click ENABLED (next to NIC-TEAMING) (a windows shows) -right-click on MANAGEMENTTEAM (lower-left) > click PROPERTIES -click ADDITIONAL-PROPERTIES (at the bottom). -set SWITCH-INDEPENDENT -set ADDRESS-HASH (if you set to the HYPER-V-PORT setting, each VM will be assigned to a specific NIC). -set STANDBY as NONE
***To be clear, this is set for LOAD-BALANCING (not FAILOVER).*** We would need another NIC to enable failover. Simply add the NIC to the team. Then choose that NIC to be the STANDBY ADAPTER. A real team/bond requires configuration on the switchs (or more specifically on the switch ports) to create an EtherChannel. If you are to do this, make it easy on yourself and make certain all the switches are the same model. Then make certain all have the same OS before stacking. Once stacked, configure the EtherChannel.
Teaming Mode
Switch-independent teaming allows you to connect team members to multiple, non-stack switches.
LACP teaming, the server and switch will split traffic between all links that are up. It requires switch configuration to build a LACP/LAG which has intelligence that tells the switch to track each active cable in the link and whether that cable is actually connected. If the cable is unavailable, it is unused until the cable is available and connected again.
Static teaming is used when LACP is not available. It still requires switch configuration to create a LAG.
Load Balancing
Load balancing in a team does not evenly split incoming traffic between each link in team; this is unlike a "load balancing appliance" or traditional load balancer.
Address Hash mode uses MAC addresses to attempt to use the source and destination addresses and ports to create an effective balance between team members.
Hyper-V Port mode is intended only for use on Hyper-V virtual machine hosts. This will assign MAC address to each machine on the virtual machine host and then assign a team member to each of the MAC addresses. Only used in certain scenarios.
In Dynamic mode, inbound traffic is split by assigning team members to different MAC addresses. Outbound traffic is split by a combination hash derived from IP/Port. This should provide better overall balancing and is almost always the best load balancing option to use.
Outlook 2016 Calendar Sharing - "You Don't Have Permission To Create An Entry In This Folder"
SCENARIO
You try and share a calendar in Outlook 2016. When the person who has EDITOR accessrights adds the shared calendar to their Outlook, they get the following message: "You Don't Have Permission To Create An Entry In This Folder...."
RESOLUTION
There can be many reasons why this is happening. Ultimately it is a permission issue or a cache permission issue.
1-check to see if the calendar has the correct permissions.
Show Calendar Permissions Get-MailboxFolderPermission foo.user:\calendar
The non-working mailbox calendar has the correct permissions and it still doesn't work.
2-temporarily change the primary smtp address on the shared account.
Don't ask me why but I've witnessed that if the shared account (
This e-mail address is being protected from spambots. You need JavaScript enabled to view it
) changes the primary smtp email address domain (
This e-mail address is being protected from spambots. You need JavaScript enabled to view it
) sometimes the person trying to access the calendar can suddenly edit the calendar if they remove the calendar and add it back in. Here's how...
On OUTLOOK where you are trying to access the shared calendar: -click CALENDAR (bottom-left). -find OTHER CALENDARS. -right-click on the calendar-name. -click DELETE CALENDAR (don't worry, this only removes the calendar. It doesn't actually delete the calendar). -close OUTLOOK.
-change primary smtp via ECP (web interface) from
This e-mail address is being protected from spambots. You need JavaScript enabled to view it
to:
This e-mail address is being protected from spambots. You need JavaScript enabled to view it
-open OUTLOOK. -be sure address is updated in ADDRESS-BOOK (global-address-list).
-click CALENDAR (bottom-left). -find OTHER CALENDARS. -right-click OTHER CALENDARS > ADD CALENDAR > OPEN SHARED CALENDAR. -type in the name of the person. -click OK. -wait about 10 seconds.
WORKS WITH NEW DOMAIN!!! And can edit the calendar.
-remove the shared calendar (same as above).
-change primary smtp via ECP (web interface)from
This e-mail address is being protected from spambots. You need JavaScript enabled to view it
to:
This e-mail address is being protected from spambots. You need JavaScript enabled to view it
-added calendar (same as above).
WORKS WITH ORIGINAL DOMAIN!!! And can edit the calendar.
It is important to note that changing via Exchange Management Shell (EMS) did not work and resulted in the original error.
$Set-Mailbox foo.user -PrimarySmtpAddress
This e-mail address is being protected from spambots. You need JavaScript enabled to view it
$Add-MailboxFolderPermission foo.user:\calendar -User foo.user2
I'm not sure if this is an emailaddresses issue. Or a missing value in one of the keys that is changed in the ECP and not in the EMS. Or if it is a global-address cache issue. Or if it a GAL sync issue that takes time. All I can tell you is that I performed the steps above and it worked. Took me a good 30 hours or so to figure that out.
In any event, I checked the following but nothing produced any meaningful results concerning this issue: $Get-mailboxpermission foo.user |fl $Get-Mailbox foo.user| Select-Object -ExpandProperty EmailAddresses $Get-CalendarProcessing foo.user |fl $Get-CASmailbox foo.user| fl
3-check the offlineaddressbook setting for the mailboxdatabase
Somewhere along the line during initial install, a CU update or creation of a new mailboxdatabase, the OFFLINEADDRESS book key is blank/null. I think it would automatically default to the default address book but I really don't know. I haven't found any info that says have a null value is bad but most info I see says to set it for all mailboxdatabases.
Find the name of the OFFLINE ADDRESS BOOK:
Get-OfflineAddressBook |select name
Now set the MAILBOXDATABASE to use that name:
Get-Mailboxdatabase | Set-MailboxDatabase -OfflineAddressBook “Default Offline Address Book (Ex2013)”
NOTES
Calendar Permissions can be set individually or by role. The DEFAULT permissions are: ReadItems, CreateItems, EditOwnedItems, EditAllItems, CreateSubfolders, FolderVisible
Or another way to view the DEFAULT role is like this (the minus is what the role doesn't have): ReadItems CreateItems EditOwnedItems EditAllItems CreateSubfolders FolderVisible -DeleteOwnedItems -DeleteAllItems -FolderOwner -FolderContact
The EDITOR role permissions are: ReadItems, CreateItems, EditOwnedItems, EditAllItems, FolderVisible, DeleteOwnedItems, DeleteAllItems
Or another way to view the EDITOR role is like this (the minus is what the role doesn't have): ReadItems CreateItems EditOwnedItems EditAllItems -createsubfolders FolderVisible DeleteOwnedItems DeleteAllItems -FolderOwner -FolderContact
GET PERMISSION TO MAILBOX
Sometimes getting the permissions to the mailbox helps: Get-MailboxPermission foo.user
GET PERMISSION TO MAILBOX THAT IS ANOTHER USER
Sometimes it helps to see who else has permission to the mailbox: Get-MailboxPermission foo.user |? {$_.IsInherited -ne "true" -and $_.User -ne "NT AUTHORITY\SELF"}
Another way is: get-mailboxpermission foo.user |where { ($_.IsInherited -eq $false) -and -not ($_.User -like “NT AUTHORITY\SELF”) } |select user,accessrights,deny,inheritancetype
Which is the same as: Get-MailboxPermission foo.user |? {$_.IsInherited -eq "$false -and $_.User -ne "NT AUTHORITY\SELF"} |select user,accessrights,deny,inheritancetype
CHANGE PERMISSION TO MAILBOX
Sometimes you need to change permissions on the mailbox: Set-MailboxPermission foo.user -user foo.user2 -AccessRights FullAccess
Sometimes, seeing the complete folder structure of the mailbox helps: get-MailboxFolder foo.user:\ -recurse
GET THE CALENDAR NAME
Sometimes getting the calendar name helps because it is changed from another language: Get-MailboxFolderStatistics foo.user |where-object { $_.FolderType -eq "Calendar" } |select-Object Name
ADD CALENDAR FOLDER PERMISSIONS
Sometimes you need to add permissions to the calendar: Add-MailboxFolderPermission foo.user:\calendar -User foo.user2 -AccessRights Editor
REMOVE CALENDAR FOLDER PERMISSIONS
Sometimes you need to remove permissions to the calendar: remove-MailboxFolderPermission -Identity foo.user:\calendar -User foo.user2
SEE MAILBOXES IN ORGANIZATIONAL UNIT
Sometimes you need to see the email in a single AD OU: get-mailbox -OrganizationalUnit "ou=where-ever,ou=whatever-users,dc=domain,dc=tld" -resultsize unlimited |get-mailboxstatistics |ft DisplayName,TotalItemSize,Itemcount
REMOVE CACHE SHARED CALENDAR FOLDERS IN OUTLOOK 2016:
Sometimes working off of cached shared calendar folders causes an issue and you need to remove the cache folders from OUTLOOK 2016: -account-settings > email > change > more-settings > advanced -uncheck "Download Shard Folders" -restart OUTLOOK
REMOVE CACHE FOLDERS IN OUTLOOK 2016:
Sometimes working off of cached folders causes an issue and you need to remove all the cache folders from OUTLOOK 2016: -account-settings > email > change -uncheck "Use Cached Exchange Mode" -click NEXT > FINISHED -restart OUTLOOK
Windows Server 2012 Connect Branch Office to HQ Domain And Replicate Domain And Replicate DNS
I had new 10K server and wanted to test out before making changes. The goal is to turn it into a VM. Test out connecting to the HQ domain and replicate the domain and dns. In this situation the branch office already had a domain. The location was purchased by HQ and needed to roll into the HQ domain.
Couple of notes before we begin: -keep your domain flat. If you can, do NOT do subdomains, trusts, etc. It's too much of a pain later on. Keep it simple. -you can have 2 domains on the same network (just not 2 DHCP servers).
CREATE VIRTUAL MACHINE
HYPER-V is included in WINDOWS-10. So all we have to do is create a new VHDX from the existing SDD that came with the server.
-connect SDD to WINDOWS-10 via USB caddy. -download DISK2VHD. -created server-2012r2 vm with DISK2VHD (you only need the main partition). -started HYPER-V -created new VM (do not import, etc). -attached newly created VHDX, no-network, 4 processors, 10GB ram. -booted for first time. -installed dns, ad, file. -shutdown. -create VSWITCH external-network & allow-management-operating-system-to-share-this-network-adapter (no vlan id). -attached VSWITCH to VM.
ADD BRANCH OFFICE TO DOMAIN
-on hq ad server: ad-sites-services > create-new-site-for-branch-office -on hq ad server: ad-sites-services > subnets > create subnets-for-branch-office & attach to branch-office -on hq ad server: ad-sites-services > inter-site-transports > ip > create new > hq/branch > 15 mins
JOIN BRANCH OFFICE SERVER TO HQ DOMAIN
Simple enough but if you've never done it before you might be thinking there's something more to it. There isn't.
-start VM -change ip address to static-ip -change dns to dns at hq -join domain -restart
PROMOTE BRANCH OFFICE SERVER AS DOMAIN CONTROLLER
-click MANAGE > ADD-ROLES-AND-FEATURES -click NEXT > NEXT > NEXT -click ACTIVE-DIRECTORY-DOMAIN-SERVICES -let it go through its setup. -click promote to DOMAIN-CONTROLLER (upper-right flag) -select ADD-A-DOMAIN-CONTROLLER-TO-AN-EXISTING-DOMAIN -select DNS SERVER & GC (global catalog) -create DRSM password. -except defaults until INSTALL. -click INSTALL -wait -server reboots
REPLICATE BRANCH OFFICE SERVER DOMAIN CONTROLLER
-check USERS&COMPUTERS to see if in DOMAIN-CONTROLLERS -check SITES&SERVICES -view all servers are correct. -click NTDS SETTINGS -right-click right-panel -click REPLICATE-NOW -cycle through all NTDS SETTINGS -right-click NTDS-SETTINGS > ALL-TASKS > CHECK-REPLICATION-TOPOLOGY -cycle through all NTDS SETTINGS -ps-type: repadmin /replsummary (on the new server, the largest delta is 'unknown') -click NTDS SETTINGS -right-click right-panel -click REPLICATE-NOW -ps-type: repadmin /replsummary (on the new server, notice the time is now a few seconds)
I have a storage array with 12 3.5" drives. It's a little older but it works. It has an LSI sticker on it.
I pop in some hard drives, plug in the Ethernet connection and power it on.
Now, how do I control it? There is no monitor connection.
So, I look at the DHCP find the ip address. I put the ip address in the browser but nothing shows.
With a tool, I see that it is showing as a NETAPP device. Hmmm... I thought it was LSI but OK.
I do a little googling and find that NETAPP purchased the storage array division from LSI.
So I go to the NETAPP (who acquired LSI) web site for support. I see that it needs a program called SANTRCITY. SANTRICITY isn't offered as a free download, I have to register for it.
No problem. I register for the support site and try to download it. No go. I'm "unauthorized" for that download.
No problem. I provide the SERIAL-NUMBER on the device and wait.
I receive a message from NETAPP stating that they won't provide support since they made it for someone else who branded it as their own. Also known as an OEM. It even states in their LSI acquire document: http://mysupport.netapp.com/NOW/public/apbu/oemcp/NetApp_Engenio_Support_Integration_FAQ.pdf
But who is the OEM? I don't know. There are no markings on the device. This OEM is supposed to provide SANTRICITY or a rebrand of the app to control the storage device.
I find out that the device is actually an LSI CTS2600. The LSI CTS2600 was made for DELL as the POWERVAULT MD3200. I download the DELL software but it doesn't find the array that is booted. I try a couple more times without success.
I finally hear back from NETAPP that the OEM is BLUEARC. Great! A little more googling and I see that it is a BlueArc Mercury 50.
BLUEARC was purchased by HITACHI. Humph... Siging up for the access to Hitachi support web site.
The BLUEARC software was incorporated into HITACHI COMMAND SUITE.
https://support.hds.com/en_us/user/downloads/ is empty. So I emailed support.
Support writes back that there is no support contract on the device so they will not provide any help.
Now I have a 20K SAN that boots and physically works but I have no way to control it or manage it. In other words, I have a 20K boat anchor.
Good thing there are FTP sites with admins that don't lock them up :-)
If you are "missing" free space, and only have a few GB left when you should have many GB left (or TB), the culprit could likely be:
-permission issue. You cannot see the size of a folder if you do not have read permissions to access the folder.
-SHADOW COPIES.
You can see if there are SHADOWS by following the instructions in the previous post. One item that VSSADMIN and DISKSHADOW will not show is the size of the SHADOW. Bummer.
The Windows OS saves these SHADOWS in the SYSTEM VOLUME INFORMATION folder. For various reasons, a typical administrator does not have permissions to that folder. This causes an issue because you cannot know the size of the folder through EXPLORER.
So how do you know the size of the SYSTEM VOLUME INFORMATION folder? Here's how using robocopy:
DISKSHADOW And VSSADMIN control shadows. But what's a "shadow"? Good question.
A shadow is copy of file or a volume. This can be done even while the file is in use. The proper name for this is Volume Snapshot Service or Volume Shadow Copy Service or VSS. And it works at a block level (rather than a file level).
There are a couple of parts to this but the heart of the technology is the VOLUME SHADOW COPY SERVICE which performs the actual copy.
The transfer of the data is called a PROVIDER. While Windows comes with its own PROVIDER, other software companies can create their own providers. An example of a built-in PROVIDER is SYSTEM RESTORE or PREVIOUS VERSIONS for a file or folder. An example of an outside software company is SHADOWPROTECT. While SHADOWPROTECT is an outside company, it still relies on VSS to create the shadow on its behalf. SHADOWPROTECT does not create its own shadow.
The shadows are traditionally managed by VSSADMIN. Here's how to show all PROVIDERS in either powershell or command-line:
vssadmin list providers
And here's how to show the SHADOWS:
vssadmin list shadows
And here's how to show the SHADOW storage:
vssadmin list shadowstorage
VSSADMIN is not the only tool. Another tool gives more info. That is DISKSHADOW. DISKSHADOW is a interactive command interpreter like DISKPART. What I've found is that DISKSHADOW is a more accurate and more powerful tool.
Here's how to enter DISKSHADOW interactive:
DISKSHADOW
Here's how to show all PROVIDERS:
DISKSHADOW> list providers
Here's how to show all SHADOWS:
DISKSHADOW> list shadows all
It will show all the SHADOWS, if it is created for a builtin provider or for an 3rd party provider. And it will show the provider ID for each shadow.
To add info, you should be able to limit the size of a shadow:
-computer-management
-right-click SHARD-FOLDER (on the left-hand side)
-click ALL-TASK > CONFIGURE-SHADOW-COPIES
-click SETTINGS for each drive and adjust the size as you see fit.
NOTE: you can also do this on the DISK-MANAGEMENT snap-in.
[NOTE: please read entire document before proceeding.]
Upgrading all the Polycom phones across an entire location has been a mission. Again, there's so much mis-information and different setups it is hard to weed through it all.
In short, you need first provision the phones.
Secondly, you need to update the firmware and software. In older Polycom phones, called SoundPoint phones, you need 2 files uploaded to your phone-server for each model of phone-set. The 2 files are:
the bootrom/bootloader/updater file.
the sip/uc-software/application (sip.ld) file.
In newer Polycom phone, called VVX phones, the bootrom/bootloader/updater file is automatically included in the sip/uc-software/application (sip.ld) file.
STAGE 1: Provision Polycom Phones
Polycom phones can boot with power or POE (hint, use POE). Without a configuration, they won't do anything except complain. Configurations are great because they determine nearly everything on the phone. You can set phone call features, backgrounds and even speakerphone volume. In fact, you can set just about everything.
The configuration can be kept in one of the following locations:
phone: settings set by the buttons on the phone.
web: settings set by the web interface.
server: central server that provides the configuration.
We are interested in large deployments, so we will focus on central server deployments. This is important because the configuration of the setup is usually more than just the phone server and attention is needed elsewhere. If your phone are getting configurations and you don't see them in the phone set or on the phone server, the the DHCP server is where to look.
Central server deployments can serve the configuration files through:
FTP
TFTP
HTTP/HTTPS
Most deployments will use FTP since it can be setup everywhere; meaning inside the office and outside the office. On the other hand, TFTP will only be available inside the office.
Upon booting, phones will naturally try to get an IP address from a DHCP server. When they talk to the DHCP server, the server can respond with some options to tell the Polycom phones where to look for the configuration files.
The options are:
OPTION-066: this is a typical TFTP server option. However, it may already be in use by something else so Polycom had to put in a higher priority option customized just for Polycom phones.
OPTION-160: this is a Polycom specific TFTP server option. Polycom phones are hard-coded to look for this option first. This will have to be added as an option on a MS DHCP server.
To add the option to MS DHCP:
-start the DHCP server-manager
-right-click IPV4 or IPV6 (on the left-hand side).
-click SET-PREDEFINED-OPTIONS
-click ADD
-type: NAME: Polycom Boot Server Name DATA: String CODE: 160 DESCRIPTION: doesn't-matter
This is the secret sauce and test it out before roll-out on large deployments by rebooting just one phone. This will set the value on the phone. If the value is set incorrectly and is unable to find the central-server, the phone will not be able to obtain the configuration files and will use the cached configuration. The only way I know to clear the cache is to login to the web interface:
-click UTILITIES > SOFTWARE-UPGRADE
-click CLEAR-UPGRADE-SERVER
If that doesn't work, factory default the phone. This can be harder than it sounds.
-hold 1-3-5; type in 456 or type in the macaddress from the bottom of the phone (001122334455)
-press HOME > SETTINGS > ADVANCED > ADMINISTRATOR-SETTINGS > RESET-TO-DEFAULTS > RESET-WEB-CONFIG (wipes macaddress-web.cfg from server)
-press HOME > SETTINGS > ADVANCED > ADMINISTRATOR-SETTINGS > RESET-TO-DEFAULTS > RESET-TO-FACTORY (wipes all configuration containers on the device)
-press HOME > SETTINGS > ADVANCED > ADMINISTRATOR-SETTINGS > RESET-TO-DEFAULTS > FORMAT-FILE-SYSTEM (wipes app from phone and will require provisioning server to work again)
You can see if the provisioning worked by looking at the phone:
-press HOME > SETTINGS > STATUS > PLATFORM > CONFIGURATION
-see the boot server, boot type and configuration files.
2-unzip the download and inside the folder you will see the bootloader files like: 2345-12560-001.bootrom.ld
3-Take all the BOOTROM files and upload them to your phone-server (provisioning server) in the tftpboot directory. (fyi - the tftpboot directory will be at the root of the filesystem: /tftpboot.) The chart below will show what bootrom goes with what phone-set model.
FILES
DESCRIPTION
bootrom.ld
Concatenated BootROM
2345-12345-001.bootrom.ld
????? (Probably SoundPoint IP 300/302/320/330)
2345-12360-001.bootrom.ld
SoundPoint IP 321
2345-12365-001.bootrom.ld
SoundPoint IP 331
2345-12375-001.bootrom.ld
SoundPoint IP 335
2345-12450-001.bootrom.ld
SoundPoint IP 450
2345-12500-001.bootrom.ld
SoundPoint IP 550
2345-12560-001.bootrom.ld
SoundPoint IP 560
2345-12600-001.bootrom.ld
SoundPoint IP 650
2345-12670-001.bootrom.ld
SoundPoint IP 670
2345-17960-001.sip.ld
VVX 1500
3111-15600-001.bootrom.ld
SoundStation IP 6000
3111-17823-001.dect.ld
VVX D60 Wireless Handset & Base Station
3111-19000-001.sip.ld
SoundStation Duo
3111-30900-001.bootrom.ld
SoundStation IP 5000
3111-33215-001.sip.ld
SoundStructure
3111-36150-001.sip.ld
SpectraLink 8440
3111-36152-001.sip.ld
SpectraLink 8450
3111-36154-001.sip.ld
SpectraLink 8452
3111-40000-001.bootrom.ld
SoundStation IP 7000
3111-40250-001.sip.ld
VVX 101
3111-40450-001.sip.ld
VVX 201
3111-44500-001.sip.ld
VVX 500
3111-44600-001.sip.ld
VVX 600
3111-46135-002.sip.ld
VVX 300
3111-46161-001.sip.ld
VVX 310
3111-46157-002.sip.ld
VVX 400
3111-46162-001.sip.ld
VVX 410
3111-48300-001.sip.ld
VVX 301
3111-48350-001.sip.ld
VVX 311
3111-48400-001.sip.ld
VVX 401
3111-48450-001.sip.ld
VVX 411
3111-48500-001.sip.ld
VVX 501
3111-48600-001.sip.ld
VVX 601
3111-48810-001.sip.ld
VVX 150
3111-48820-001.sip.ld
VVX 250
3111-48830-001.sip.ld
VVX 350
3111-48840-001.sip.ld
VVX 450
Great! You are halfway there.
STAGE 3: THE SIP.LD FILE aka POLYCOM-UC-SOFTWARE aka APPLICATION)
The SIP.LD file is the image that will be served by the TFTP/FTP central server. This is the same as the APPLICATION VERSION or the SIP APPLICATION VERSION.
2-Second, download the most recent version of the firmware (get the SPLIT-DOWNLOAD [not combined-download]). There are many options here but they should be boiled down to either "Current GA for Microsoft Lync" or "Current GA Release" (Hopefully it's obvious, the MS Lync is for MS Lync servers. If you do not know what that is, don't worry about it as it is not the one you need). (As of this writing the Current General Availability for SOUNDPOINT phone-sets is v4.0.11).
3-unzip the download and inside the folder, you will see SIP.LD files like: 2345-12560-001.sip.ld
4-Take all the LD files and upload them to your phone-server (provisioning server) in the tftpboot directory. Overwrite any files that are currently there (even if they are from the bootrom zip from above). [This process is easier than figuring out if we need the files or not. Having everything will not hurt anything.]
5-Once there, rename the file according to your system. Use the guide above as direction. I had to rename the files as such: sip.SPIP560.4.0.11.revc.ld sip.VVX410.5.7.0.revc.ld
STAGE 4: CONFIG FILES
----------From here, there might be some troubleshooting. Namely, some of the old config files may not work with the most recent firmware. Edit the files accordingly in the tftpboot directory.
Each phone will have a MAC-address number on the back. Something like, 0004123EDT78.
So, each phone will have a base-config file of mac-number.cfg. Something like, 0004123EDT78.cfg
The phones are hard coded to look for this file.
The first part of the file will dictate that SIP.LD/APPLICATON file. It will look like this:
With our directory structure in place, we can have the same model of phones use different APPLICATION versions at the same time. And we can have different models of phones use different APPLICATION versions at the same time. All of this is done by changing the base-config file.
This file will determine what SIP.LD file to use and what further config files to use. Before the update, the contents will look something like this: <APPLICATION APP_FILE_PATH="sip.[PHONE_MODEL].3.2.3.revc.ld" CONFIG_FILES="deviceset-12345.cfg, phone-0004123EDT78.cfg, sip.3.2.3.revc.cfg" MISC_FILES="0004123EDT78-directory.xml" LOG_FILE_DIRECTORY="" OVERRIDES_DIRECTORY="" CONTACTS_DIRECTORY="" LICENSE_DIRECTORY=""> </APPLICATION>
After the update, you need to edit the file to look something like this: <APPLICATION APP_FILE_PATH="sip.[PHONE_MODEL].4.0.11.revc.ld" CONFIG_FILES="deviceset-12345.cfg, phone-0004123EDT78.cfg, sip.4.0.11.revc.cfg" MISC_FILES="0004123EDT78-directory.xml" LOG_FILE_DIRECTORY="" OVERRIDES_DIRECTORY="" CONTACTS_DIRECTORY="" LICENSE_DIRECTORY=""> </APPLICATION>
You can do this file-by-file if needed.
Or you can run one command on the phone-server.
1-make sure you are in the tftpboot directory
2-make a directory for the backup of the files: mkdir cfgfiles
3-copy all the base config files into this directory: cp ./000*.cfg ./cfgfiles (or cp ./6416*.cfg ./cfgfiles)
4-change all the files at once: sed -i -e "s/3.2.3.revc.ld/4.0.11.revc.ld/g" ./000*.cfg
This will update all the base-config files to tell the phone-sets to use the new SIP.LD/APPLICATION files.
PHONE OVERRIDE FILES
Phone override files are changes made from the phone-set and are named <MAC Address>-phone.cfg. So something like, 0004123EDT78-phone.cfg
On my phone-server, the older phone override files were named phone-0004123EDT78.cfg
If they have parameters older than v3.3.0, you will get an error message. To fix, see below in the "UPDATE CONFIG FILE WITH UTILITY" section.
WEB OVERRIDE FILES
If you change something via the phone-set web interface, it will save the settings in a web-override file named <MAC Address>-web.cfg. So something like, 0004123EDT78-web.cfg
STAGE 5: REBOOT
Now reboot the phone. It should upgrade the bootrom automatically. You do not need to do anything as the phone is hard coded to look for and use the newest bootrom available.
After the bootrom is updated, the application/sip.ld will update. This process may take around 10 minutes per phone.
If you have a POE switch, you can do this across the network by unplugging the POE switch. Wait about 1 minute. Plug the POE switch back in. Then wait about 15 minutes for all the phone to upgrade. (Of course, wait for after hours time period.)
STAGE 6: UPDATE CONFIG FILE WITH UTILITY
If you have an older config file, the Polycom phone-set will give an error. Something like, "phone-0004123EDT78.cfg is pre-3.3.0 params." Basically it is saying that you are trying to config a parameter that doesn't exist.
You can see what config files are being used and which have errors by:
-press HOME > SETTINGS > STATUS > PLATFORM > CONFIGURATION scroll down on the phone and it will show the number of PRE-3.3.0, ERRORS, DUPLICATES and OK's.
Consequently, you will have to update your config files to remove those parameters.This can be done parameter-by-parameter by looking at the log file on the phone (or server) and manually adjusting for each.
Or you can do this automatically with a Windows software utility called: CFCUtility. Your results may vary so be careful with the utility.
-in the CFCUtiliy folder, create a folder called "config-files".
-on the central-server, make sure you are in the tftpboot directory.
-make a backup directory: mkdir cfgphonefiles
-copy all the phone files to this directory (as a backup for safe keeping): cp ./*cfg ./cfgphonefiles/
-gather all the config-files in the folder called "config-files". (this can be done by mounting usb drive, ftp, scp, etc)
-from a Windows command-line change to the CFCUtiliy folder.
-type: cfcUtility.exe -t ./config-files
-it will ask you some generic questions and accept the defaults.
Now you can transfer the files back to the phone-server in the tftpboot directory.
-reboot the phone(s). (remember, if you have a POE switch unplug the switch and plug back in for a network-wide solution)
-it will reboot 2 or 3 times on it's own.
UNCOMPLICATING CONFIG FILES
All the configuration for the phones can be done in one config file if we really wanted to. Or we could have one really long config file for each phone. But for sanity's sake, we break this out.
In the tftpboot directory, you will have some files for each phone-set:
0004123EDT78.cfg (the base config. The backup is in the cfgfiles directory) 0004123EDT78-phone.cfg (the new phone override, used automatically) 0004123EDT78-web.cfg (the new web override, used automatically) phone-0004123EDT78.cfg (the old phone override, used by the base-config file. This file is converted and a backup is in the cfgphonefiles directory. It can be deleted since it is not being used.)
Other config files can be present as well (but not required). In the unzip folder of the Polycom UC Software from STAGE-3, you can find the generic config files:
64167f920093-reg-basic.cfg (for the line registration) 64167f920093-features.cfg (for the features of the phone) polycom.UC5.7.0.sip-basic-11325.cfg (for the line registration of the location) polycom.UC5.7.0.device-11325.cfg (for device settings for the location) polycom.UC5.7.0.sip-interop-11325.cfg (for interoffice operation settings) polycom.UC5.7.0.site-11325.cfg (for site settings like timezone)
You can see the entire list of options/values by inspecting the 73,000 line file in the unzip download:
Updating the ADMX Templates in Windows Server to Apply GPO to Windows 10 is a manual process. A Windows Server can control Windows client computers through Group Policy/Group Policy Objects (GP/GPO). It does this through template files called ADMX files. These ADMX files simply correspond to registry-edits (regedits).
Since not all regedits are available on OS versions (for example, controlling OneDrive was included along the way), there is a set of ADMX files for common milestones like:
-Windows 7
-Windows 7 SP1
-Windows 8
-Windows 8.1
-Windows 10
-Windows 10 (1511)
-Windows 10 (1607) Anniversary Update
The ADMX files are not automatically updated on the Windows Server. They must be manually updated. The updates are in MSI files (and not zipped files). The instructions are pretty simple once someone shows you:
-download the ADMX msi.
-install the ADMX msi. This will unpack the ADMX files in a folder called "Policy Definitions" in the c:\program files (x86) but you can change the location to another.
-copy the entire contents to: C:\Windows\SYSVOL\sysvol\domain-name\Policies\PolicyDefinitions\
Or in any Windows 10 client: C:\Windows\PolicyDefinitions
Be careful taking the ones installed in a client OS and putting them on a Domain controller that manages multiple OS's. It can be dangerous because they often can have different settings, different ADMX names and can be missing settings for supporting previous versions of the OS.
This video explains it better than I can:
NOTES:
adm files are older.
admx files are newer.
adml files are xml translation/localization files.
You have multiple servers. Despite there being a sync between them, only one can be the master for certain operations. For example, only one server can hold the official invitation list. The other bouncers will have to check the master list. This master is called the FSMO.
So how do you know which server is the FSMO? How do you find the FSMO in your domain?
Here's how:
open cmd
type: netdom query fsmo
You can also:
-open ACTIVE-DIRECTORY-USERS-AND-COMPUTERS.
-right-click on the domain-name (on the left-hand side).
-click OPERATIONS MASTER.
-it should show you there as well. At the different tabs at the top, you can select which OPERATION you are interested in.
Black Screen of Death on Windows 10 v1607 Update (aka Anniversary Update - a Feature Update) upon reboot. The only way to get out of it is to power down the computer. Upon reboot, the computer will revert to the previous version of Windows 10 v1511.
So how to get Windows 10 v1607 Update (aka Anniversary Update) to install?
-start the update. -manually reboot to finish. -before it reboots, unplug the USB dongle for the Logitech wireless mouse or wireless keyboard. -the update will install.
In the spirit of "just show me how to fix it" I will be succinct.
The older Intel HD Graphics 3000 (or Sandy Bridge) is no longer working in WINDOWS-10(v1607). It used to work in WINDOWS-10(v1511) but INTEL is pushing foreword. The same is true for Intel HD Graphics 2000 and HD Graphics. This is basically the Intel 6 Generation Chipset.
-Intel refuses to produce drivers for this graphics card on it's own but has released a driver and provided it to MS. -the driver is version 9.17.10.4459. -the driver has to be gotten from MS and not from INTEL: http://catalog.update.microsoft.com/v7/site/Search.aspx?q=9.17.10.4459 (it is named: 200028694_9f1eae50bc588760715acd70172f5487dc461e64)
CASE-1 -INTEL GRAPHICS HD 3000 -black screen of death trying to update to WIN-v1607. -the driver is v9.17.10.4299. -had to manually untar the cab. -had to manually update the driver to v9.17.10.4459 -also installed the latest CHIPSET driver for QM67 (intel 6 series).
CASE-2 -INTEL GRAPHICS HD 2000 -black screen of death trying to update to WIN-v1607. -the driver is v9.17.10.4299. -had to manually untar the cab. -had to manually update the driver to v9.17.10.4459 -also installed the latest CHIPSET driver for Q65 (intel 6 series).
CASE-3 -INTEL GMA 4500 (g41 chipset) -black screen of death trying to update to WIN-v1607. -the driver is v8.15.10.2702 -make sure KB3176938 is installed.
You might get the following, "Couldn't update the primary SMTP address because this mailbox is configured to use an e-mail address policy."
Here's how to fix: Set-Mailbox foo.user -PrimarySmtpAddress
This e-mail address is being protected from spambots. You need JavaScript enabled to view it
-EmailAddressPolicyEnabled $false
This will ADD the email address as the Primary SMTP Email Address and keep the current email address as a receiving email address.
Or if you need to set all the addresses for one mailbox all at once (the captial SMTP is the primary smtp address and the lowercase smtp is the additional smtp email addresses):
So you want to grab all the photos from a web site do you? Here's how:
wget -nd -r -A jpg -e robots=off http://wherever.tld
This will put all the photos from the web site you reference (and all lower directories) to a single directory. This will not magically grab photos from a directory which has no page attached to it and has random names.
If you do know the names are sequential numbers then you can try:
wget -nd -r -A jpg -e robots=off http://wherever.tld/gallery/{0..1000}.jpg
Cancel EXCHANGE update (CU13) because it requires a HOTFIX (or two) before it continues. Afterwards, OUTLOOKs are disconnected; OUTLOOK-WEB-ACCESS works; sending & receiving email doesn't work. Hmmmm.... what to do.
Checking the WINDOWS logs and I see:
"Failed to discover Ews Url for mailbox"
Then I check for the EXCHANGE COMPONENT STATUS:
Get-ServerComponentState –Identity ServerNameHere
This will tell you the state of the server components in an ACTIVE/INACTIVE way. If something is INACTIVE, you can turn it to ACTIVE by:
Get-ServerComponentState –Identity ServerNameHere -Component ServerWideOffline -State Active -Requester Functional
sc stop MSExchangeTransport
sc stop MSExchangeFrontEndTransport
timeout 80
sc start MSExchangeTransport
sc start MSExchangeFrontEndTransport
It should turn back to ACTIVE. However, if there was a second REQUESTER making the change to INACTIVE, this REQUESTER must also set to ACTIVE for the whole status to be ACTIVE:
Get-ServerComponentState –Identity ServerNameHere -Component ServerWideOffline -State Active -Requester Maintenance
sc stop MSExchangeTransport
sc stop MSExchangeFrontEndTransport
timeout 80
sc start MSExchangeTransport
sc start MSExchangeFrontEndTransport
Another way to fix this is to install the HOTFIXES that are needed and then proceed with the EXCHANGE update. Wait about an hour or so and viola! Working server automatically. Apparently, the EXCHANGE update automatically turns off some of the components. If the update is canceled, these components are left in the INACTIVE state. Going through the update process turns the components to the ACTIVE state automatically.
DOTNET is a computer language. If it is installed on you, you can speak it and understand it.
DOTNET is to MICROSOFT what JAVA is to SUN/ORACLE.
DOTNET has the following: SDK (software developement kit) RUNTIME (to run apps) RUNTIME-DEVELOPER-PACK (to use the framework with Visual Studio.) CORE: an open source development platform for developing modern cloud-based software apps. FRAMEWORK: Windows only development platform for developing Windows apps.
There are certain versions of DOTNET that automatically come with certain versions of WINDOWS. They are as follows:
DOTNET VERSION
DATE
WINDOWS VERSION
1.0.0
02/13/02
XP
1.1.0
04/24/03
N/A
2.0.0
11/07/05
N/A
3.0.0
11/06/06
Vista
3.5.0
11/19/07
7
4.0.0
04/12/10
N/A
4.5.0 (378389)
08/15/12
8
4.5.1 (378675/378758)
10/17/13
8.1
4.5.2 (379893)
05/05/14
N/A
4.6.0 (393295)
07/20/15
10
4.6.1 (394254)
11/30/15
10 v1511 (November Update)
4.6.2 (394802)
08/02/16
10 v1607 (Anniversary Update)
4.7.0 (460798)
04/11/17
10 v1703 (Creators Update)
4.7.1 (461308)
10/17/17
10 v1709 (Fall Creators Update)
4.7.2 (461808)
04/10/18
10 v1803 (April 2018 Update)
4.7.2 (461814)
10/09/18
10 v1809 (October 2018 Update)
4.8.0 (528040)
05/21/19
10 v1903 (May 2019 Update)
4.8.0 (528040)
11/12/19
10 v1909 (November 2019 Update)
DOTNET can be installed in parallel with other versions. For example, v3.5 can be installed with v4.0.
Certain versions of DOTNET are required for certain software to run. If something is built to run off of v3.5, this doesn't mean it will work with v4.6.2.
Starting with WINDOWS 10, DOTNET v4.6.0 is included.
DOTNET v3.5 (including v2 & v1) is included in WINDOWS 10 as a "feature" but it is not installed/enabled.
TO SEE IF DOTNET 3.5 (v2 & v1) IS INSTALLED ON WINDOWS 10
-click START > RUN
-type: cmd
-type: DISM /Online /get-features /Format:Table
This will list out all the features of WINDOWS 10 and their status.
You are looking for NETFX3. This is DOTNET v3.2 (v2 & v1).
For simplicity, the files must match the verion. So for v1909 you will need the files from the 1909 ISO to make this happen. Older versions of the files will not work. Small files, so simply transfer the folder with the 2 files. The entire ISO is not needed.
FIND DOTNET VERISION
To find the DOTNET version:
-type: Get-ChildItem "hklm:SOFTWARE\Microsoft\NET Framework Setup\NDP\v4\Full\" or
-type: reg query "hklm\SOFTWARE\Microsoft\NET Framework Setup\NDP\v4\full" /v Release This will give the value in HEX. You have to convert the HEX number to DEC.
This will give a RELEASE value that corrosponds to a VERSION number. See the chart above. (Do not pay attention to the VERSION number that it shows; you need the RELEASE number that shows.)
FIND DOTNET SDK AND RUNTIME
To find the DOTNET version of the SDK and RUNTIME:
When permissions in WINDOWS is FUBAR'd, start from scratch by resetting the permissions as they would be if nothing has changed.
RESET PERMS FOR DIR RECURSIVELY icacls folder-name-here /t /reset
Now, from this point if you would like to add a USERNAME or GROUPNAME:
ADD FULL PERMS FOR DIR RECURSIVELY (doesn't change existing) icacls folder-name-here /grant username-or-groupname:f /t
If you want to set permissions explicitly as you tell it to:
REMOVE INHERITANCE | GRANT USERNAME | (CI) ENSURES NEW ITEMS WILL HAVE THESE PERMS (changes everything from scratch) icacls foo-folder /inheritance:r /grant username:(ci)f /t
EXAMPLE (This is probably what you want. The SYSTEM, OWNER, ADMINISTRATORS all have FULL CONTROL. The USERNAME has READ-ONLY-CONTROL). icacls foo-dir /inheritance:r /grant "creator owner":(CI)(CI)F system:(CI)(CI)F administrators:(CI)(CI)F other-username-for-full-control:(CI)(CI)F other-groupname-for read-control:(CI)(CI)RX /T
BONUS: If you need to take ownership beforehand, you can do so by the following: takeown /f top-folder-name /r /d y
Waking remote computers with WOL. As usual, the options are dizzying. Here's a cheat sheet.
See what's capable:
powercfg -devicequery wake_from_any
But this list is too long. Since not all devices can be config'd, some devices are going to wake whether the user wants them to or not. So to see what's capable of being user config'd (what can be changed):
powercfg -devicequery wake_programmable
See what's enabled:
powercfg -devicequery wake_armed
And finally, to enable a device to be a waking point:
POWERCFG -deviceenablewake "exact device name here"
A quick batch script would be:
POWERCFG -devicequery wake_from_any | FINDSTR /i "net" > c:\foo\adapters.txt
FOR /F "tokens=*" %%i IN (c:\foo\adapters.txt) DO POWERCFG -deviceenablewake "%%i"
-you will see 4 options WINDOWS 10 (all languages) WINDOWS 10 K (Korean law) WINDOWS 10 N (European law) WINDOWS 10 SINGLE LANGUAGE (1 language only)
-simply download the one you need. The one that matches what you have now which is probably WINDOWS 10 ALL LANGUAGES.
-again, since you are doing an IN-PLACE UPGRADE, the ISO must match what's on your system now. Many of the issues people are having is that they are trying to upgrade their system with a WINDOWS 10 PRO SINGLE LANGUAGE when they have WINDOWS 7 ALL LANGUAGES installed on their machine.
NOTE: do NOT use the MEDIA-CREATION-TOOL for this exercise.
STEP 2: mount WINDOWS 10 ISO
This means show the files that are in the ISO. Windows 7 cannot do this without some help such as WINRAR, 7ZIP or VIRTUAL-CLONEDRIVE. WINDOWS SERVER 2012, WINDOWS 8.1 and newer can do this without additional software. This can happen either through the GUI or through POWERSHELL command MOUNT-DISKIMAGE.
There is no correct way on how you mount the ISO, just do it.
STEP 3: create the network share
Create the share:
md C:\installs\os\win10x64\unpack
And share it so everyone can read it (outside the scope of this article post).
STEP 4: copy the ISO contents onto a created network share.
I use ROBOCOPY to do this. It is built into WINDOWS 7 and newer. Something like:
robocopy /e f:\ C:\installs\os\win10x64\unpack
STEP 5: Build your install package
Pretty easy when you know what to do it right.
-select the setup.exe on the network share. Something like: \\myserver\installs\os\win10x64\unpack\setup.exe
-type in the parameters: /auto upgrade /Compat IgnoreWarning /installfrom c:\Windows\AdminArsenal\PDQDeployRunner\service-1\exec\sources\install.wim /dynamicupdate disable /showoobe none /quiet NOTE: if you would like, you can save the log files as well. Add the following to the end of the parameters above: /copylogs \\myserver\installs\os\win10x64\logs
-checkmark "Include Entire Directory"
click PACKAGE PROPERTIES
make sure the COPY MODE is changed to PULL (not PUSH).
checkmark "use custom timeout" and change the number to 240.
save the package.
STEP 6: deploy on test victim.
That should do it!!! If the test pc works, deploy to the rest of the pc's how you see fit.
Standard (or "category 1"), no Ethernet; High Speed (or "category 2"), no Ethernet; Standard, with Ethernet; High Speed, with Ethernet; Premium, no Ethernet; Premium, with Ethernet.
Full Disclosure: I have an AudioQuest cable. Picked it up at a conference as a freebie ;-)
WINDOWS 10 is having trouble installing software. This is a complex issue but basically some software won't install (or updates won't install) because of an ERROR 1603. More specifically: ErrorCode: 1603(0x643).
Turning on VERBOSE logging (check another article but it puts the logs in %user%\appdata\local\temp) for the install, it shows that the actual error is: CAInitSPPTokenStore.x86: Error: Failed to initialize the SPP Token store. HResult: 0x80070057. Hmmm... What to do?
-click START > RUN > REGEDIT
-navigate to: hkey_local_machine/software/microsoft/windows nt/currentversion/profilelist
Nested underneath, you will see SID's. Somthing like:
s-1-5-18
s-1-5-19
s-1-5-20
s-1-5-21-...1000
s-1-5-21-...1003
s-1-5-82
To see what SID's corrospond to actual accounts.
-type: wmic useraccount get name,sid
You'll see something like:
1000 owner
1003 tempfix
Notice that s-1-5-18, s-1-5-19, s-1-5-20 do not show. So what's up? Well, this is because these are system-accounts that are not be used/seen. This is what we are concerned about. They are as follows:
s-1-5-18 is SYSTEM
s-1-5-19 is LOCAL SERVICE
s-1-5-20 is NETWORK SERVICE
Next, go back to regedit to: hkey_users
A DEFAULT NORMAL INSTALL has something like:
S-1-5-18
s-1-5-19
s-1-5-20
s-1-5-21-...1215
s-1-5-21-...1216
s-1-5-21-...1217
What we are seeing is that some of the upgrades to WINDOWS 10 are BROKEN and has the following:
-in explorer travel to C:\Windows\ServiceProfiles\NetworkService\NTUSER.DAT
-right-click > properties > security > edit > add
-type: NETWORK SERVICE
-give NETWORK SERVICE full-control
-reboot
Now, upon reboot, open REGEDIT again and go to HKEY_USERS. You should now see that s-1-5-20 is added back in. Let's add the correct permissions:
-right-click on S-1-5-20
-click permissions > add
-type: network service
-click OK
-checkmark FULL CONTROL
-click OK
I do not have a good explanation of why this happens. It could be a corrupt file. It could be a failed upgrade. It could be some type of antivirus. I do not know. What I know is that this took a few days to figure out and the software will now install successfully!!!!
Let's say that you have an OFFICE 2010 install that doesn't work. You cannot uninstall it either. Nor do you have a CD/USB/SOURCE to install because it was on your computer when you bought it and you just used a PRODUCT KEY.
What do you do?
NOTE: !!!Make sure you have your PRODUCT KEY!!! You can get this with BELARC-ADVISOR (among many others).
1 - UNINSTALL OFFICE
You can uninstall office by using the automatic uninstall tool here:
"Your PC Ran Into A Problem And Needs To Restart" Windows 10 Loop!
or
"Your PC did not start correctly"
Collectively, let's all say "Arrrrrrrrrrrrrrrrgh!!!"
This is the stuff that I really dread for the average person. How in the world is a normal person supposed to be able to get through an issue like this?
There are 10 possible reasons for this loop and possibly more that need repairing:
1-startup repair
2-checkdisk
3-system restore
4-safe boot / low res
5-sfc
6-windowsapps folder
7-registry repair
8-boot repair
9-dism
10-reload and transfer
ISSUE 1 - There is a startup problem (startup repair).
-click ADVANCED OPTIONS.
-click TROUBLESHOOT.
-click ADVANCED OPTIONS.
-click STARTUP REPAIR.
-let it go through its process and restart.
ISSUE 2 - There is a filesystem problem (checkdisk).
-click ADVANCED OPTIONS.
-click TROUBLESHOOT.
-click ADVANCED OPTIONS.
-click COMMAND PROMPT
-type: chkdsk d: /f /r
(note depending on what your OS drive letter is, this could be: chkdsk c: /f /r)
-let it go through its process and restart.
ISSUE 3 - System Restore
-click ADVANCED OPTIONS.
-click TROUBLESHOOT.
-click ADVANCED OPTIONS.
-click SYSTEM RESTORE.
this will go through a process of showing previous time in the past. You can choose one of these points. Your system-files will go back to that time, removing any updates, patches or changes. Your document-files will remain as they are now.
-let it go through its process and restart.
ISSUE 4 - safe-mode or low-resolution-video
-click ADVANCED OPTIONS.
-click TROUBLESHOOT.
-click ADVANCED OPTIONS.
-click STARTUP-SETTINGS
-the computer will reboot and give the options to press F1 through F9
-press F3 to try low-resolution video as sometimes Windows 10 suddenly doesn't like the video drivers.
-or press F5 to try to get to safe-mode-with-networking.
ISSUE 5 - sfc
-click ADVANCED OPTIONS.
-click TROUBLESHOOT.
-click ADVANCED OPTIONS.
-click COMMAND PROMPT
-type: sfc /scannow
-let it go through its process and restart.
ISSUE 6 - windowsapps folder
For some reason the "windowsapps" folder gets messed up during an update or during system-restore (message about "appxstaging"):
-click ADVANCED OPTIONS.
-click TROUBLESHOOT.
-click ADVANCED OPTIONS.
-click COMMAND PROMPT
-type: takeown /f "C:\Program Files\WindowsApps" /r /d Y
(that is: copy-space-asterisk-space-dot-dot-backslash)
-hit enter
-type: exit
-let it reboot and see if that works.
ISSUE 8 - There is a boot problem.
-click ADVANCED OPTIONS.
-click TROUBLESHOOT.
-click ADVANCED OPTIONS.
-click COMMAND PROMPT
-type:bootrec.exe /fixmbr
-type: bootrec.exe /fixboot
-type: bootrec.exe /RebuildBcd
-type: exit
-let it reboot and see if that works.
ISSUE 9 - dism
This is the only issue that I have not tried personally as I've never had to get this far. The idea is that there is something wrong with Windows and that it can be repaired:
-click ADVANCED OPTIONS.
-click TROUBLESHOOT.
-click ADVANCED OPTIONS.
-click COMMAND PROMPT
-type: dism /online /cleanup-image /scanhealth
-type: dism /online /cleanup-image /restorehealth
-let it go through its process and restart.
ISSUE 10 - reload and transfer
If I've gone through the 9 issues above without success, I throw in the towel and reload Windows 10 on a new hard drive (ssd) and transfer the data. Not ideal but usually by this point, reloading and transferring data is going to be faster than further troubleshooting.
Those are the 10 issues that I go through when I get, "Your PC Ran Into A Problem And Needs To Restart" Windows 10 Loop.
Upon, reboot the system bios beeps: 1-3-2. In other words, beep (pause) beep-beep-beep (pause) beep-beep. Nothing. No bios. Just black screen.
The only way to get it to reboot properly without the bios beeps is to yank the power from the computer. Wait till the electricity discharges from the motherboard by holding in the power button. Plug the system back into the power. Press the power button.
But here's how to fix:
-upgrade the bios.
-reset to defaults.
-turn off the FAST BOOT.
-disable the DISKETTE DRIVE.
-uncheck the ONBOARD OR USB FLOPPY DRIVE.
-uncheck the ONBOARD OR USB CD DRIVE.
While we are at it, change the silly default options:
-disable LOW-POWER-MODE.
-enable HYPER-THREADING (if you have it).
-enable MULTICORE.
-enable TURBOBOOST.
-disable SPEEDSTEP.
-enable SMART TEST.
There could be other reasons. For me, this was what worked. The key seemed to be something in the FASTBOOT and the DISKETTE DRIVE.
NOTES:
-this was a 6 month process :-(
-replacing the 525W power supply with a 850W power supply didn't work.
01 -click START > RUN > CMD (or POWERSHELL) (as administrator) 02 -type: echo y | reg add "HKLM\SYSTEM\CurrentControlSet\Control\Power\PowerSettings\238C9FA8-0AAD-41ED-83F4-97BE242C8F20\7bc4a2f9-d8fc-4469-b07b-33eb785aaca0" /v Attributes /d 2 03 -enter 04 -type: echo y | reg add "HKLM\SYSTEM\CurrentControlSet\Control\Power\PowerSettings\2a737441-1930-4402-8d77-b2bebba308a3\d4e98f31-5ffe-4ce1-be31-1b38b384c009" /v Attributes /d 2 05 -enter 06 -click START > CONTROL-PANEL > POWER-OPTIONS > CHANGE-THE-PLAN-SETTINGS > click on the "Change advanced power settings". 07 -click on the "Change settings that are currently unavailable" 08 -click Sleep > System unattended sleep timeout > type 0 09 -click USB-SETTINGS > USB-3-LINK-POWER-MANAGEMENT > set to OFF 10 -click OK 11 That's it!!! You did it!!!
I'm not an expert on ACTIVATION as LICENSING is a pain. Luckily, I'm in a corporate situation where budgets are secondary to getting it working. KMS & MAK are not covered here. Here's how:
-click START > RUN
-type: cmd
-type: cd C:\Program Files\Microsoft Office\Office15
From here, there are 3 basic commands to help and resolve: STATUS, CHANGE, ACTIVATE.
But what if you want to create a multiple boot USB disk where WINDOWS 10 is just one of the options? You would somehow have to create a WINDOWS 10 ISO.
I enjoy the E2B project. Despite being wordy and looking complicated, it's actually fairly simple. Here's the shortcut.
-you will see 4 options WINDOWS 10 (all languages) WINDOWS 10 K (Korean law) WINDOWS 10 N (European law) WINDOWS 10 SINGLE LANGUAGE (1 language only)
-simply download the one you want (probably WINDOWS 10 ALL LANGUAGES)
For me, doing this somehow downloaded the iso as a WINDOWS 10 HOME version. It doesn't matter, it will still install WINDOWS 10 PRO. But I would like the INSTALL.EDB to say WINDOWS 10 PRO. I do not know yet if it matters.
NOTE: If you are doing an IN-PLACE UPGRADE, the ISO must match what's on your system now. Many of the issues people are having is that they are trying to upgrade their system with a WINDOWS 10 PRO SINGLE LANGUAGE when they have WINDOWS 7 ALL LANGUAGES installed on their machine.
SECOND WAY TO GET WINDOWS 10 ISO
So you have a bootable USB to install WINDOWS 10. You want to turn that into an ISO. How do you do it?
You don't turn it into an ISO. You turn it into a IMG (more specifically an imgPTN file). I won't go into details but you can't turn an entire bootable USB into an ISO easily. There's too many variables. But you can turn a bootable USB partition into a bootable partition image, hence imgPTN.
Here's how to turn it into an BOOTABLE IMG.
-download the software to create a PARTITION IMAGE here:
This will allow users to set an appointment with the ROOM as the LOCATION but will only allow the ORGANIZER to adjust the appointment (rather than letting anyone change the appointment).
Clean installing Windows 10 can be a pain. There's too many gotchas that it can be frustrating.
Here's how I did it:
-download the MEDIA CREATION TOOL for WINDOWS 10.
-after your have created the USB, check to make sure you have the right BUILD NUMBER (see other article post).
-SKIP PRODUCT KEY DURING INSTALL (OR "Do This Later or I Don't Have a Key"). Save the activation after install with your Windows 7, 8 or 8.1 Product Key, even if embedded in BIOS. (NOTE: this is in contrast to the WINDOWS 8 that requires to NOT select "I don't have a product key" as activation will not be successful. )
Finding the Windows 10 ISO version or Build Number is important because builds starting in November 2015 and newer allow you to clean install Windows 10 if you have Windows 7 or Windows 8.
-mount the ISO to expose the files. This can be done through Windows 10, if you have another computer available or through VirtualCD.
-find where the "install.wim" (or install.esd) is. For example; F:\sources\install.wim
If you disable a MAILBOX in EXCHANGE, the account is available for 30 days by default. However if you disable a MAILBOX in EXCHANGE and you disable an AD account, the MAILBOX will not show as a disconnected MAILBOX.
Here's how to get it back on demand.
First, check to see the RETENTION settings of the MAILBOXDATABASE: