In theory, the handset and the base go together. Plug in the base and the handset works with that base.
ADD W52P HANDSET TO BASE
However, you can add the handset to another base if needed:
- -press the button on the base.
- -press REGISTER on the phone set.
Long way:
- -login to the base web page.
- -click ACCOUNT (at the top).
- -select ACCOUNT1, ACCOUNT2, ACCOUNT3, ACCOUNT4, ACCOUNT5
- -fill in the necessary information
FACTORY DEFAULT YEALINK W52P
To factory-default the base:
- -unplug power.
- -hold in the button (there's only one button).
- -plug in the power.
- -all 3 led's will light up.
- -unplug power.
- -plug power back in.
UPGRADEYEALINK W52P
In normal circumstances, the firmware of the base and the handset can be updated here:
http://support.yealink.com/documentFront/forwardToDocumentDetailPage?documentId=25
The firmware of the base can be updated via the web.
The firmware of the handset can be updated via the web (if the base firmware is new enough). Or the firmware of the handset can updated via usb. This requires the usb tool here:
Upgrading W52x Handset Firmware.zip
UPGRADE YEALINK W52P BRICKED / NOT RESPONDING
In some cases, there is still no response after the factory default or if the firmware upgrade was incomplete/corrupt. The base needs to be put in recovery mode and is look for a tftp from 192.168.0.23.
To fix, you will need to:
- -download the newest firmware for the base: http://support.yealink.com/documentFront/forwardToDocumentDetailPage?documentId=25
- -unzip.
- -rename the firmware to: W52P.rom
(I used the files here: W52P.zip)
TFTP
- -download a TFTP-SERVER: http://www.tftpd64.com/tftpd32_download.html
- -get the PORTABLE version.
- -unzip the files.
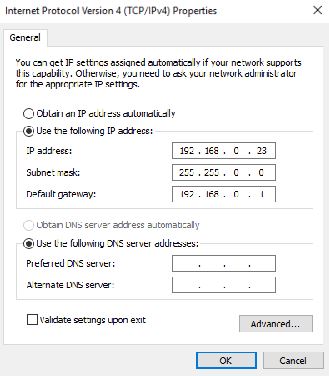
- -set your computer IP to: 192.168.0.23
- -set your computer SUBNET to: 255.255.0.0
- -set your computer GATEWAY to: 192.168.0.1
NETWORK
- -get a switch.
- -get 2 ethernet cables.
- -plug computer into switch.
- -disable wireless, if needed.
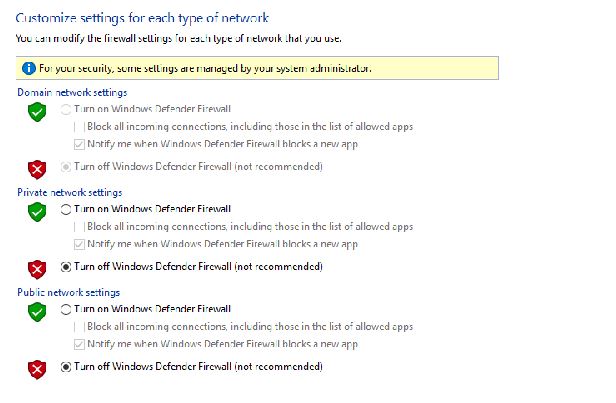
- -disable firewall.
TFTP-UPLOAD
- -start the tftpd32.exe/tftpd64.exe
- -create a tftproot folder at the root of c:\ (so it should be: c:\tftproot)
- -upload the W52P.rom, W5X.rfs, W5X.bin
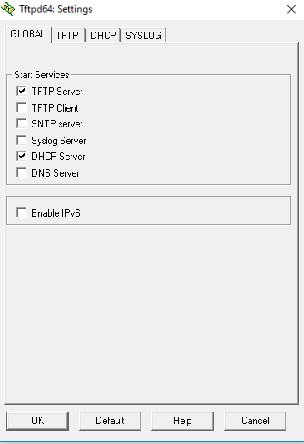
TFTP-SETTINGS-GLOBAL
- -click SETTINGS.
- -click GLOBAL
- -checkmark DHCP
- -checkmark TFTP
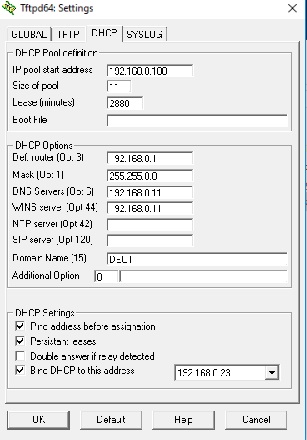
TFTP-SETTINGS-DHCP
- -set IP-POOL-START-ADDRESS as: 192.168.0.100
- -set SIZE-OF-POOL to: 11
- -set the options to (these are irrelevant, so it doesn't matter):
- 192.168.0.1
- 255.255.0.0
- 192.168.0.11
- 192.168.0.11
- -set the BIND-ADDRESS to: 192.168.0.23
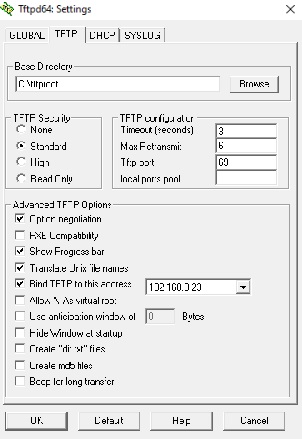
TFTP-SETTINGS-TFTP
- -checkmark BIND-TFTP-TO-THIS-ADDRESS: 192.168.0.23
TFTP-SERVER-RESTART
- -close the TFTP server software
- -start the TFTP server software
BASE
- -unplug power
- -hold in the button (there's only one button).
- -plug in the power.
- -all 3 led's will light up.
- -release the button.
(if that doesn't work, try when only 2 led's light up and release the button) - -wait about 10 minutes to be sure.
- -the BASE unit should upgrade the firmware, reboot and be accessible at: 192.168.0.100
(You can follow along in the TFTP log. It will show activity so you know if it is working)
NOTES:
-here is the Yealink PDF instructions: Recovery_Mode_on_Yealink_IP_Phones_build.pdf